
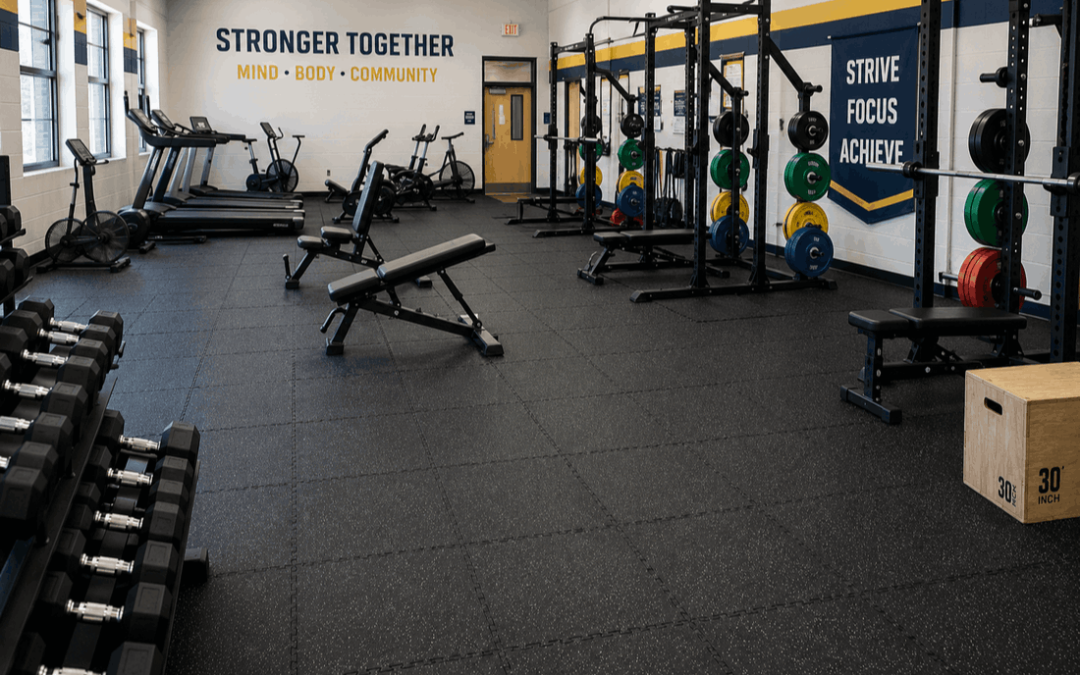
Interlocking rubber tiles for schools can provide a modular flooring option for weight rooms, fitness spaces, training halls and selected community gym areas. However, the correct tile must be chosen according to the age groups using the facility, exercise equipment, expected impact, daily traffic and supporting floor. Explore our gym flooring for schools and shared training facilities when comparing suitable surfaces for institutional fitness areas.
School and community gyms usually serve more people than a private home gym. The floor may be used by learners, coaches, community members, sports teams and organised exercise groups throughout the week.
This shared use can place greater demands on the flooring. Equipment may be moved regularly, cleaning may occur several times per day and users may enter the room wearing different types of footwear.
A suitable floor should support the intended activities while remaining practical to inspect, clean, repair and replace. The selection process must therefore consider more than colour and appearance.
Are Interlocking Rubber Tiles Suitable for Shared Gyms?
They may be suitable when the product specification matches the activities, equipment, traffic and installation conditions. Modular rubber tiles can work well in school weight rooms, community fitness spaces and selected multipurpose facilities, but not every tile is designed for heavy weights, wheeled equipment or repeated impact.
Why Shared Fitness Facilities Need Careful Flooring Planning
A school or community gym is rarely used for only one activity. The same room may support fitness classes in the morning, learner training during the day and community exercise sessions in the evening.
This changing use affects floor selection. A surface that works beneath stationary cardio equipment may not provide enough protection in a free-weight zone.
The room may also contain benches, racks, storage units, exercise machines and open floor space. Each part of the room can create different pressure, impact and cleaning requirements.
Learner fitness areas
The floor may support supervised circuits, bodyweight training, resistance work and selected exercise equipment.
Mixed-age exercise groups
Different users may bring varied footwear, equipment and exercise routines into the same room.
Team conditioning spaces
School and local teams may use the facility for strength, mobility and conditioning sessions.
Choosing Interlocking Rubber Tiles for Schools
When selecting interlocking rubber tiles for schools, begin by identifying the heaviest activity expected in each part of the facility. Do not choose the complete floor according to the lightest exercise session.
Record the equipment, number of users, session frequency and whether weights will be placed down carefully or dropped. These details influence tile thickness, density and the need for specialist impact flooring.
Also confirm that the product is genuinely made from rubber. Some visually similar interlocking tiles may be manufactured from PVC, foam or another material with different performance characteristics.
Material check: Confirm the exact material composition before ordering. Rubber, PVC and EVA products should not be described as though they are the same flooring.
School Halls Versus Dedicated Weight Rooms
A general school hall may host assemblies, light exercise, indoor activities and community events. A dedicated weight room normally receives more concentrated equipment loads and impact.
A rubber floor selected for a weight room may not be necessary across an entire multipurpose hall. Likewise, a thin general-purpose tile used in a hall may not be suitable beneath heavy racks and barbells.
Multipurpose hall priorities
- General movement and pedestrian traffic
- Cleaning between different activities
- Furniture and temporary equipment
- Doorway and transition planning
- Easy localised replacement
- Flexible room layouts
Weight-room priorities
- Rack and equipment loads
- Dumbbell and barbell impact
- Storage of heavy plates
- Floor protection beneath machines
- More frequent join inspections
- Specialist lifting zones
Community Gyms With Mixed User Groups
Community gyms may serve teenagers, adults, older users, local sports teams and supervised exercise groups. The floor should support the planned activities without creating difficult transitions or unstable equipment.
Facility managers should consider how quickly the room changes between sessions. Benches, mats and portable exercise equipment may be moved several times each day.
The flooring should remain stable during normal use and should be inspected after equipment has been repositioned. Any separated joins or raised edges should be corrected promptly.
Plan the Gym by Activity Zone
Dividing the room into activity zones can make the flooring decision easier. The cardio section, stretching area and free-weight zone do not always require the same thickness or construction.
| Activity zone | Typical use | Main flooring consideration |
|---|---|---|
| Cardio area | Treadmills, exercise bikes, rowers and similar machines. | Equipment stability, vibration and narrow machine feet. |
| Bodyweight area | Circuits, mobility exercises and controlled floor work. | Surface firmness, cleaning and open movement space. |
| Resistance area | Benches, cable machines and controlled dumbbell exercises. | Equipment pressure and moderate impact. |
| Free-weight zone | Racks, barbells, plates and heavier dumbbells. | Greater thickness or specialist impact flooring. |
| Storage zone | Plate racks, cabinets and portable equipment. | Static loads and concentrated support feet. |
Choosing the Correct Tile Thickness
Thickness should be matched to the activity rather than selected only by cost. A thinner rubber tile may suit controlled fitness areas, while free-weight and equipment sections may require more material depth.
A thicker tile is not automatically better. Density, rubber composition, product design and intended use also influence performance.
Review our guide to selecting the correct rubber tile thickness before choosing flooring for shared fitness areas.
| Flooring range | Possible starting use | Important limitation |
|---|---|---|
| 5–6mm | General exercise, pedestrian zones and selected cardio areas. | May provide limited protection from heavy impact. |
| 8–10mm | Equipment rooms, resistance training and more demanding areas. | Not automatically suitable for repeated weight dropping. |
| 15–20mm+ | Specialist lifting and higher-impact free-weight zones. | Creates greater floor height and transition requirements. |
Static Loads and Equipment Feet
Heavy gym machines may transfer their weight through a few small feet. This creates concentrated pressure even when the equipment remains stationary.
The floor should remain firm enough to keep the machine stable. A very soft tile may compress unevenly beneath narrow support points.
Suitable load-distribution pads may be needed beneath racks, plate-storage units and cardio equipment. These pads should remain stable and should not create raised edges in walking routes.
Free Weights and Impact Areas
Dumbbells and barbells create different demands from stationary machines. A weight placed down carefully creates less impact than one repeatedly dropped from height.
Do not assume that all interlocking rubber tiles for schools can support repeated heavy weight dropping. The exact product must be designed for the expected impact.
A school weight room may benefit from a dedicated lifting section using thicker specialist tiles or an appropriate lifting platform.
Impact reminder: General-purpose rubber tiles should not be advertised as suitable for all dropped weights unless their specification confirms that use.
Supporting Floors and Subfloor Preparation
Concrete is common in school gyms, community halls and converted fitness rooms. It should be firm, clean, dry and reasonably level before modular flooring is installed.
Remove dust, grit, loose coatings and raised repair material. Large cracks, holes and unresolved moisture should be assessed before covering the floor.
Where ceramic tiles or another finished surface remain underneath, check that the base is stable and that the new flooring will not prevent doors from opening.
Installing Interlocking Rubber Tiles Over Concrete
Begin by measuring the room and identifying fixed equipment, columns, doors and floor transitions. Complete a dry layout before cutting perimeter tiles.
Use a straight reference line so the first connected rows remain square. Check every join as the installation progresses.
Read our detailed guide to installing interlocking rubber tiles over concrete before beginning a school or community facility project.
Loose-Laid Versus Secured Installation
Many interlocking floors can remain loose-laid in enclosed rooms because the connected tiles function as one larger surface.
However, schools and community facilities may experience heavier traffic than a private room. Additional securing may be required around doors, ramps, open edges and areas exposed to wheeled equipment.
Use only an adhesive or fixing method confirmed as compatible with the tile and supporting floor.
Doorways and Floor Transitions
The finished floor height should be measured before ordering. Thick tiles may affect doors, cupboards and transitions into neighbouring rooms.
Exposed edges should be finished with a suitable ramp, border or transition strip. This is especially important where the floor meets a passage or accessible route.
Doorway areas should be inspected regularly because they receive concentrated traffic and cleaning activity.
Accessibility and Movement Through the Facility
Floor planning should consider all expected users, including people using mobility aids. Transition heights, doorway widths and changes between floor surfaces should be reviewed as part of the complete facility design.
Do not claim that every modular floor is automatically wheelchair accessible. Suitability depends on the tile thickness, surface, edges and transition design.
Keep movement routes clear of loose equipment, raised joins and unfinished tile edges.
Visible Puzzle Joins or Hidden Joins?
Traditional puzzle tiles display their joining tabs around each edge. This creates a clearly modular appearance and makes the connections easy to identify during inspection.
Hidden-lock tiles place most of the joining system below the visible surface. They may provide a cleaner and more continuous-looking finish.
The join style should not be used as a substitute for checking thickness, density and intended application. Both systems require correct alignment and routine inspection.
Browse our range of modular interlocking rubber tiles when comparing visible and concealed joining options.
Cleaning Busy School and Community Gyms
Shared gyms may require more frequent cleaning than private training rooms. Dust, grit, sweat and spills should be removed before they collect around equipment and tile joins.
Sweep or vacuum loose particles before damp cleaning. Use a mild cleaner confirmed as suitable for the rubber material.
Avoid excessive water, strong solvents and oily cleaners. Cleaning residue can affect the surface and create slippery conditions.
Simple cleaning routine
- Remove loose litter
- Sweep or vacuum grit
- Clean spills promptly
- Use a compatible mild cleaner
- Damp-mop controlled sections
- Remove cleaning residue
- Allow the floor to dry
- Inspect tile joins
- Check equipment feet
- Clean doorway transitions
- Record damaged sections
- Replace unsafe tiles promptly
Sweat, Water and Wet-Floor Management
Interlocking rubber floors are not necessarily watertight. Moisture may enter through joins, edges or damaged sections.
Spills should be cleaned promptly, and the floor should be allowed to dry before the next session. Trapped moisture may create odours or maintenance problems.
Facility managers should investigate recurring water entry rather than covering it with flooring.
For general information about preventing slips and trips, review the guidance on preventing slips and trips.
Routine Inspection and Localised Replacement
One advantage of modular flooring is that selected damaged tiles may be replaceable without removing the complete floor.
Inspect high-traffic sections, free-weight zones, equipment feet and doorways regularly. Look for separated joins, compressed areas, tears and raised edges.
Store several spare tiles from the original order where possible. This can make future replacement easier and may provide a closer visual match.
Managing Equipment Movement
Heavy equipment should be lifted and repositioned using suitable handling methods. Dragging machines across the floor can separate joins or damage tile surfaces.
Portable benches and racks should be checked for sharp edges or damaged feet before being moved.
After rearranging the room, inspect the floor and confirm that all equipment remains level and stable.
Full-Room Coverage or Localised Zones?
Not every facility requires rubber across the complete room. Localised flooring may be suitable beneath gym equipment, racks and selected training areas.
Full-room coverage can create one consistent surface and reduce exposed internal edges. It may also require more cutting, transitions and material.
Full-room coverage
- Creates a consistent appearance
- Provides wider floor protection
- Reduces internal open edges
- Supports flexible equipment layouts
- Requires more flooring material
- Needs careful doorway planning
Localised floor zones
- Uses less material
- Targets specific equipment areas
- Leaves other flooring exposed
- Requires finished border edges
- May simplify future room changes
- Needs stable transition ramps
Common Flooring Selection Mistakes
| Mistake | Possible problem | Better approach |
|---|---|---|
| Choosing by appearance only | The flooring may not suit the activity or equipment. | Check material, thickness, density and intended use. |
| Using thin tiles in impact zones | Floor and subfloor protection may be insufficient. | Use specialist flooring where heavy impact is expected. |
| Ignoring equipment feet | Small pressure points may compress the tiles. | Use suitable load-distribution protection. |
| Leaving edges unfinished | Raised edges may move or create a trip point. | Install suitable ramps and transitions. |
| Using too much water | Moisture may enter beneath the floor. | Use controlled damp-cleaning methods. |
| Not keeping spare tiles | Future replacements may not match. | Store several tiles from the original order. |
School and Community Gym Buying Checklist
Use the following checklist before requesting a quotation for interlocking rubber tiles for schools and shared community fitness facilities.
- Room dimensions
- Number of daily users
- User age groups
- Planned activities
- Cardio equipment list
- Free-weight equipment
- Heaviest dumbbell or barbell
- Whether weights will be dropped
- Equipment-foot sizes
- Supporting floor condition
- Moisture exposure
- Door clearance
- Transition requirements
- Cleaning routine
- Preferred joining style
- Spare-tile allowance
Frequently Asked Questions
Are rubber tiles suitable for a school gym?
They may be suitable when the product matches the exercises, equipment, traffic and expected impact.
What thickness should a school weight room use?
The appropriate thickness depends on the equipment, maximum weights, impact level, rubber density and supporting floor.
Can weights be dropped on interlocking rubber tiles?
Only when the exact product is designed for the expected impact. General-purpose thin tiles may not be suitable.
Can rubber tiles be installed over concrete?
Yes, when the concrete is firm, clean, dry and reasonably level.
Do school gym tiles need adhesive?
Some enclosed installations may remain loose-laid, while busy doorways, open edges and rolling loads may require additional securing.
Can individual damaged tiles be replaced?
Many modular tiles can be replaced locally, although neighbouring sections may need to be lifted from an accessible edge.
Are interlocking rubber floors waterproof?
Not necessarily. Water may pass through joins, edges or damaged areas and collect beneath the floor.
Are hidden-lock tiles better for school gyms?
They may provide a cleaner appearance, but suitability still depends on thickness, material, traffic and expected impact.
Final Advice for Shared Training Facilities
Interlocking rubber tiles for schools can support practical, modular gym layouts when the exact product is matched to the facility’s activities, equipment and traffic.
Begin by dividing the room into cardio, resistance, free-weight, storage and open exercise zones. Identify the greatest load and impact expected in each area.
Confirm the material, thickness, density and intended application before ordering. Do not assume that every rubber tile can support dropped weights, wheeled equipment or high daily traffic.
Prepare the supporting floor properly, finish doorways and open edges, and establish a regular cleaning and inspection programme.
Well-selected interlocking rubber tiles for schools and community gyms can create a practical surface that is easier to maintain, inspect and repair than a single permanent floor covering.
Need Help Planning a School or Community Gym Floor?
PVC Floor Tile supplies modular rubber flooring for school weight rooms, training facilities, community centres and shared gym spaces across South Africa. Send our team the room dimensions, user numbers, equipment list, floor photographs and expected activities for product and layout guidance.
Need help choosing suitable interlocking rubber tiles for your school or community gym? Send us your room dimensions, equipment list and floor photographs for practical product guidance.
Contact Us