
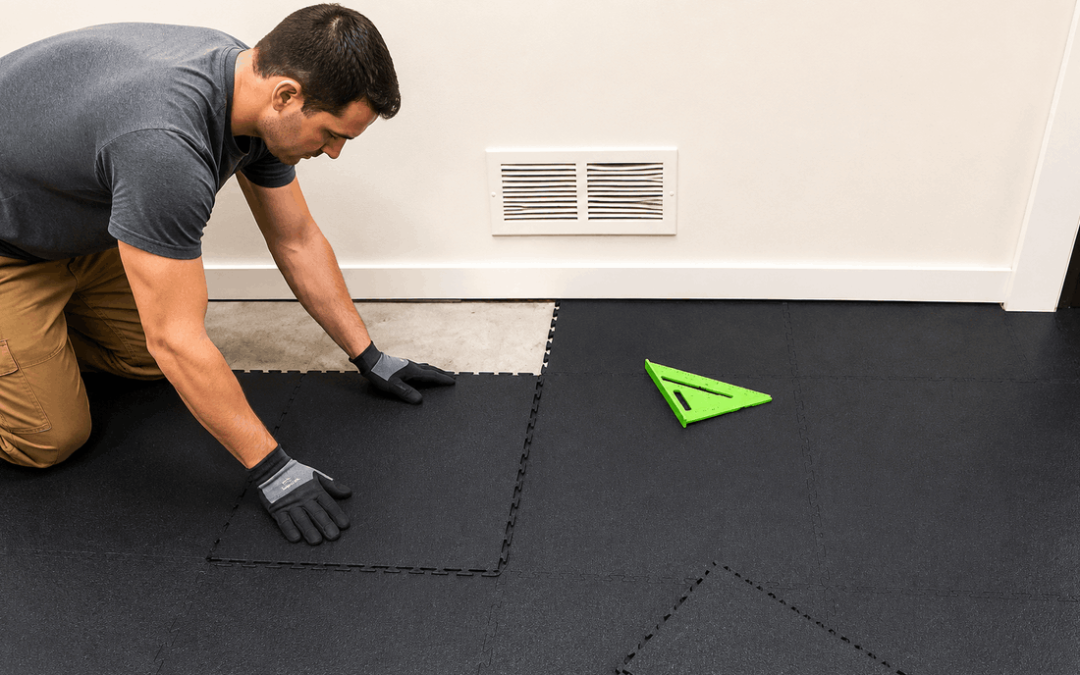
Learning how to install interlocking rubber tiles starts with preparing the concrete correctly. The floor must be firm, clean, dry and reasonably level before the first tile is positioned. Dust, oil, loose paint, raised repairs and unresolved moisture can affect the finished installation. Once the room has been assessed, browse our interlocking rubber floor tiles and confirm that the selected product suits the intended room, equipment and traffic.
Interlocking rubber tiles are modular sections that connect through visible puzzle edges or concealed joining systems. Many products can be installed without permanent adhesive in enclosed rooms, making them useful for home gyms, workshops, storage areas and selected commercial spaces.
A successful DIY installation depends on more than pressing the edges together. The room must be measured, the starting position planned, the first rows kept square and exposed edges finished properly.
This guide explains concrete preparation, room layout, cutting, fitting, doorway finishing and the conditions where additional securing may be required.
How to Install Interlocking Rubber Tiles Correctly
Prepare the concrete, measure the room, complete a dry layout and connect the tiles from a straight reference line. Cut perimeter pieces carefully, finish exposed edges and only use adhesive or additional securing when required by the product or site conditions.
Can Interlocking Rubber Tiles Be Installed Over Concrete?
Yes, many modular rubber tiles can be installed directly over suitable concrete. The surface should be structurally sound, clean, dry and reasonably level.
Minor visual imperfections may be covered, but major cracks, holes, raised repairs and water problems should not be hidden beneath the flooring.
Concrete that is soft, crumbling or contaminated may require repair before installation. A modular floor cannot correct serious structural or moisture-related defects.
Suitable concrete should be
- Firm and structurally stable
- Clean and free from loose dust
- Dry at the time of installation
- Reasonably smooth and level
- Free from raised debris
- Clear of loose coatings
Resolve these problems first
- Unresolved moisture
- Standing water
- Large holes or cracks
- Loose concrete sections
- Heavy oil contamination
- Major height differences
Tools and Materials You May Need
Prepare the tools before opening and positioning the tiles. The exact equipment depends on the tile thickness, room shape and number of cuts required.
- Tape measure
- Chalk line
- Pencil or suitable marker
- Large square
- Straight edge
- Sharp utility knife
- Replacement knife blades
- Stable cutting board
- Soft rubber mallet
- Vacuum cleaner
- Broom and dustpan
- Knee protection
- Protective gloves
- Suitable edge ramps
- Compatible adhesive if required
- Several spare tiles
Cutting reminder: Use a stable cutting surface and make repeated controlled passes with a sharp blade. Do not try to cut through a thick tile in one forceful movement.
Measure the Room Before Ordering
Measure the length and width of the room in more than one place. Concrete rooms, garages and workshops are not always perfectly square.
Record columns, steps, doorways, drains, cupboards, fixed machinery and floor-level changes. These details affect tile quantities and the number of perimeter cuts.
Calculate the total square metres and compare this with the coverage of each tile. Include an allowance for cuts, mistakes and future replacement.
Keeping spare tiles from the same production batch may help maintain a closer colour and surface match if a section needs replacing later.
Choose the Correct Rubber Tile Thickness
Tile thickness should suit the equipment, traffic, impact level, doorway clearance and supporting floor.
Thinner tiles may suit general pedestrian areas and lighter equipment. Heavier machines, gym racks or impact zones may require a thicker or more specialised rubber product.
Use our guide to choose the appropriate rubber tile thickness before ordering flooring for gyms, workshops or equipment rooms.
| Application | Main flooring consideration | Installation concern |
|---|---|---|
| General room coverage | Foot traffic and routine cleaning. | Door clearance and exposed edges. |
| Home gym | Equipment weight and expected impact. | Compression beneath racks and machines. |
| Workshop | Tools, equipment and possible substances. | Movement beneath cabinets and trolleys. |
| Storage area | Shelving and loaded cabinets. | Concentrated loads from narrow feet. |
| Commercial room | Traffic volume and maintenance routine. | Doorways, transitions and rolling loads. |
Check the Concrete for Moisture
Rubber flooring should not be used to hide an unresolved moisture problem. Water may enter through walls, doors, cracks or the concrete itself.
Loose-laid tiles are not necessarily watertight. Moisture can pass through joins and collect below the finished surface.
Look for damp areas, staining, musty odours, peeling coatings and salt-like deposits. Where moisture is suspected, obtain appropriate site advice before covering the floor.
In garages and wash areas, confirm that rainwater and cleaning water can drain away rather than becoming trapped under the tiles.
Clean and Prepare the Concrete Floor
Concrete preparation is one of the most important parts of learning how to install interlocking rubber tiles successfully. Even a well-made tile may sit unevenly if dust, grit or raised debris remains underneath.
Sweep the complete floor and then vacuum the surface, corners and wall edges. Remove loose paint, flaking sealers and unstable repair material.
Oil and grease should be cleaned using a method suitable for the concrete and the planned flooring system. Allow the floor to dry fully before continuing.
Repair holes and remove sharp raised points. Small imperfections may be tolerated by selected tiles, but the surface should not contain changes that make the tile rock or leave unsupported gaps.
Loose dirt and grit
Small particles can create raised pressure points beneath the finished floor.
Holes and unstable areas
Correct damaged concrete that prevents the tiles from sitting flat.
Moisture and cleaning residue
The floor should be dry before loose-laying or bonding the flooring.
Allow the Tiles to Adjust to the Room
Where required by the product instructions, place the boxed or stacked tiles in the installation area before fitting them.
This gives the flooring time to adjust to the room temperature. Avoid leaving the tiles in direct sunlight or next to a strong heat source.
Stack the products evenly so they are not bent or distorted. Follow the acclimatisation period recommended for the exact rubber tile.
Choose the Starting Point
The best starting point depends on whether the flooring will cover the complete room or only a defined zone.
For full-room coverage, installers may begin from a straight wall, a central reference line or another planned edge. The goal is to avoid finishing with very narrow pieces along highly visible walls.
For a small training or workshop zone, begin from the most important straight edge and plan where the exposed borders will finish.
Use a chalk line or straight reference to keep the first row aligned. A small error at the beginning can become more visible as additional rows are connected.
Complete a Dry Layout Before Cutting
A dry layout is essential when planning how to install interlocking rubber tiles across an irregular or enclosed room. Position several complete rows without cutting the perimeter pieces.
Check where the final rows will meet the walls. Avoid creating extremely narrow strips where possible because they may be difficult to cut and may not remain as stable as larger sections.
Adjust the starting line so the perimeter cuts are reasonably balanced. Confirm that the joining pattern is facing in the correct direction before connecting the full room.
A dry layout also reveals colour or surface differences between tiles. Mix tiles from several boxes where recommended so natural variation is distributed across the floor.
Planning tip: Do not begin cutting immediately against the first wall. Test several rows and confirm the finishing widths on the opposite side first.
Keep the First Rows Straight and Square
The first connected rows establish the alignment for the rest of the room. Use a large square and reference line to check their position.
Connect each edge fully before moving forward. A partly connected join can change the tile spacing and create gaps further along the floor.
Work in a consistent direction. Do not build several unrelated sections unless they have been measured carefully to meet in the correct position.
Check alignment every few rows rather than waiting until the complete room is covered.
Step-by-Step Installation Process
The following process explains how to install interlocking rubber tiles after the concrete has been cleaned, repaired, measured and dry-laid.
Mark a straight reference line
Use a chalk line, wall or planned edge to guide the first row.
Position the first full tile
Align it carefully because every additional row will follow this starting position.
Connect the neighbouring tile
Align the interlocking edges and press the complete join firmly into position.
Build complete rows
Continue from the reference line while checking that the rows remain straight.
Check every connection
Press down raised joins and correct misalignment before adding more tiles.
Measure the perimeter pieces
Mark each wall cut individually because room dimensions can vary.
Cut the edge tiles
Use a straight edge and several controlled knife passes on a stable cutting surface.
Finish doorways and open borders
Fit suitable ramps or transitions where the flooring ends at another surface.
How to Connect Puzzle-Style Edges
Position the tiles so the puzzle tabs align naturally. Do not stretch or force the edges into a mismatched position.
Begin at one end of the join and press the connection together gradually. A soft rubber mallet may help seat selected products, but avoid striking the surface aggressively.
Run your hand across the join to confirm that it is flat and fully connected. Correct raised sections before installing the next row.
How to Install Hidden-Lock Rubber Tiles
Hidden-lock tiles use a joining system positioned mainly beneath the visible surface. Their installation may require slightly more careful alignment because the complete lock is not always visible from above.
Place the tiles next to each other without trapping or folding the concealed connection. Press the joining edges firmly and check that the finished surface remains level.
Read our guide to hidden interlocking rubber flooring before choosing between concealed joins and visible puzzle-style edges.
How to Cut Interlocking Rubber Tiles
Measure the space and transfer the dimensions to the back or suitable marking surface of the tile.
Place the tile on a stable cutting board. Hold a straight edge securely along the cutting line and make several controlled passes using a sharp utility knife.
Keep fingers away from the cutting path. Change the blade when it becomes dull because a worn blade can wander and produce an uneven edge.
For thick tiles, gently flex the material along the scored line where appropriate and continue cutting in controlled stages. Do not use excessive force.
Good cutting practice
- Measure every perimeter piece
- Use a solid straight edge
- Cut on a stable surface
- Use a sharp blade
- Make several controlled passes
- Test the fit before final trimming
Avoid these mistakes
- Cutting directly on the concrete
- Using a blunt blade
- Trying to cut through in one pass
- Guessing wall dimensions
- Forcing an oversized piece
- Leaving rough exposed edges
Fitting Tiles Around Columns and Fixed Equipment
Create a simple paper or cardboard template where the shape is difficult to measure directly.
Transfer the template to the tile and check the orientation before cutting. It is easy to reverse an irregular shape accidentally.
Where possible, place fixed machinery after the flooring has been installed. Heavy equipment should be lifted and positioned rather than dragged across the joins.
Equipment with small feet may require suitable load-distribution pads to reduce concentrated pressure.
Perimeter Gaps and Expansion
Some modular floors require a small clearance around walls, columns and fixed structures. The required spacing depends on the product and installation conditions.
Do not assume one expansion-gap size for every rubber tile. Follow the product-specific guidance.
Large rooms, direct sunlight and temperature changes may influence movement. A floor installed tightly against every fixed edge may buckle if the material expands.
Finishing Doorways and Exposed Edges
An exposed edge should not be left unfinished in a regular walking or trolley route. Use a suitable transition strip, border tile or ramp.
Measure the height difference between the rubber tile and the neighbouring floor. Select a transition that fits the actual thickness.
Doorway edges should be checked regularly because they receive concentrated foot traffic and equipment movement.
Do Interlocking Rubber Tiles Need Adhesive?
Many interlocking rubber floors can remain loose-laid in enclosed rooms. The connected tiles function as one larger surface and the walls help contain the installation.
Additional securing may be required in large rooms, open-sided areas, doorways or locations exposed to rolling equipment and turning loads.
Adhesive may also be specified for selected commercial installations. Use only a product confirmed as compatible with the rubber tile and concrete.
Do not apply adhesive before confirming the layout because repositioning bonded tiles may be difficult.
Installation rule: Follow the fixing instructions supplied for the exact tile. “Interlocking” does not always mean that every site must remain completely loose-laid.
Installing Tiles in a Home Gym
Plan the positions of treadmills, racks, benches and weight storage before completing the floor.
Avoid placing exposed tile edges beneath moving equipment. Check that machines remain level and stable after positioning.
For more detailed room planning, read our guide to planning rubber flooring for a home gym.
Repeated heavy weight dropping may require specialist thicker gym tiles or impact pads rather than thin general-purpose flooring.
Installing Tiles in a Garage
Garage concrete should be checked for moisture, oil contamination and water entering beneath the door.
Not every rubber tile is suitable beneath parked vehicles, hot tyres or automotive fluids. Vehicle suitability should be confirmed for the exact product.
Read our guide to using rubber flooring in a garage before covering a vehicle parking or workshop area.
Cleaning the Completed Floor
Vacuum loose particles after installation. Remove small cutting pieces and check that every join is properly connected.
Use a mild cleaning product confirmed as suitable for rubber flooring. Avoid excessive water, strong solvents and oily cleaners that may leave residue.
Allow the floor to dry before returning heavy equipment to the room.
Final Installation Inspection
- All joins are fully connected
- The surface sits flat
- Rows remain straight
- Perimeter cuts fit neatly
- Required expansion clearance remains
- Doorways are finished
- Open edges have transitions
- No loose debris remains underneath
- Equipment sits level
- Walking routes are clear
- Spare tiles are stored safely
- The floor is clean and dry
Common Installation Mistakes
| Mistake | Possible result | Better approach |
|---|---|---|
| Installing over grit | Raised pressure points may appear. | Vacuum the concrete thoroughly. |
| Skipping the dry layout | Narrow or uneven perimeter cuts may result. | Test several rows before cutting. |
| Starting out of square | Rows may drift across the room. | Use a square and reference line. |
| Cutting with a blunt blade | Edges may become rough and uneven. | Use sharp replacement blades. |
| Forcing the tile against walls | The floor may buckle if movement occurs. | Follow the required perimeter clearance. |
| Leaving open edges unfinished | The edge may move or create a trip point. | Install suitable transitions. |
| Dragging heavy equipment | Joins may separate or surfaces may tear. | Lift and position equipment carefully. |
| Using unapproved adhesive | The tile or concrete may be damaged. | Confirm material compatibility first. |
General Working-Area Safety
Keep the installation area clear of loose offcuts, tools and packaging. These materials can create trip hazards while the work is in progress.
Clean spills promptly and avoid walking on wet sections. Finish raised edges and doorway transitions before opening the room for normal use.
For general information about preventing slips and trips, visit the Health and Safety Executive slips and trips guidance website.
Frequently Asked Questions
Can interlocking rubber tiles be installed directly over concrete?
Yes, when the concrete is firm, clean, dry and reasonably level.
How do I learn how to install interlocking rubber tiles without glue?
Begin with the exact product instructions. Many enclosed modular floors can remain loose-laid, while large rooms, open edges and rolling loads may require additional securing.
Do I need to level the concrete first?
Major holes, raised points and unstable sections should be repaired. Minor imperfections may be acceptable depending on the tile.
Can rubber tiles be installed over painted concrete?
They may be installed over stable coatings, but loose, peeling or contaminated paint should be removed first.
What is the best way to cut thick rubber tiles?
Use a sharp utility knife, straight edge, stable cutting board and several controlled passes.
Should installation start from the wall or the centre?
The best starting point depends on the room and desired perimeter cuts. Complete a dry layout before deciding.
Can equipment be placed on the floor immediately?
Loose-laid flooring may allow earlier use, while adhesive installations require the specified curing time.
Can damaged tiles be replaced later?
Many modular tiles can be replaced locally, although surrounding sections may need to be lifted from the nearest accessible edge.
Final Advice for a Successful Installation
Understanding how to install interlocking rubber tiles correctly can prevent uneven rows, rough cuts, separated joins and unfinished edges.
Begin with a firm, clean and dry concrete surface. Measure the room carefully, order enough flooring for cuts and keep several spare tiles.
Complete a dry layout before cutting. Use a straight reference line, keep the first rows square and check every join as the installation progresses.
Finish doorways and exposed edges properly. Confirm whether the exact product can remain loose-laid or requires adhesive, perimeter securing or another installation method.
A carefully planned installation can create a practical modular floor for home gyms, workshops, storage rooms and selected commercial interiors.
Need Help With Your Rubber Tile Project?
PVC Floor Tile supplies modular rubber flooring for gyms, workshops, equipment rooms and commercial spaces across South Africa. Send our team your room measurements, concrete photographs, equipment details and preferred tile thickness for product and layout assistance.
Request Flooring Installation Guidance