
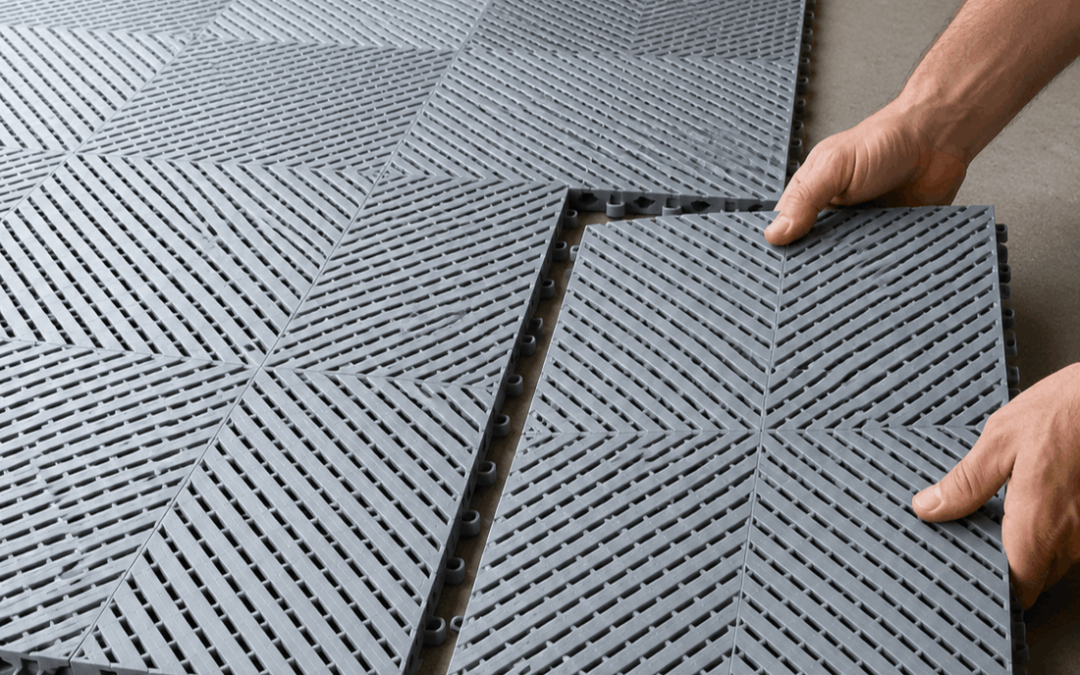
Learning how to install interlocking garage tiles can help you transform a dusty or stained concrete floor without waiting for adhesive to cure or arranging a complicated building project. A well-planned loose-lay installation can create a cleaner, more attractive and easier-to-maintain surface, but the selected tile must be approved for the conditions in your garage. Before ordering, compare the available colours, surface patterns and locking systems in our garage flooring collection.
Important product check before installation
Not every interlocking tile should automatically be installed without adhesive. Product material, tile thickness, vehicle movement, direct sunlight, temperature changes, floor condition and the size of the area can affect the correct installation method. Confirm that your chosen product is suitable for a glue-free garage installation and follow the instructions supplied with that particular tile. Adhesive or professional installation may still be recommended for demanding commercial garages, vehicle turning areas, outdoor exposure or unusually heavy equipment.
How to Install Interlocking Garage Tiles at a Glance
Empty and clean the garage, inspect the concrete, repair serious defects, measure the area, plan the pattern, identify the correct locking direction and begin laying complete tiles from a carefully chosen starting line. Connect each tile evenly, maintain the product’s required expansion space around fixed structures, trim only the perimeter pieces and finish the garage entrance with compatible edging. The locking joints hold the floor together, so glue is not normally needed when the tile and site conditions are approved for loose laying.
Prepare
Remove vehicles and storage items, then sweep, vacuum, degrease and inspect the concrete.
Plan
Measure accurately, calculate the quantity, arrange the pattern and establish a straight starting line.
Connect
Join the tiles row by row, check alignment regularly and leave the specified perimeter space.
1. Check Whether Your Garage Is Suitable for a Glue-Free Floor
Interlocking tiles form a connected modular surface. Instead of relying on adhesive between the tile and concrete, each tile connects to the next through moulded locking edges. This makes it possible to remove, replace or extend sections later, provided that the product is designed for loose-lay installation.
The existing floor does not always need to look perfect, but it should be stable enough to support the finished surface. Small marks and cosmetic stains are usually less important than loose concrete, raised ridges, deep holes, active cracking or major changes in floor level. A modular tile will follow the general shape of the substrate below it, so significant high or low areas may remain noticeable after installation.
Inspect the garage for:
- Loose, powdery or crumbling concrete.
- Deep cracks or joints that are continuing to move.
- Raised patches that could prevent tiles from sitting evenly.
- Holes or damaged areas beneath vehicle wheel paths.
- Water entering through walls, doors or the concrete slab.
- Poor drainage that allows water to remain in the garage.
- Strong direct sunlight falling on part of the floor for long periods.
- Fixed cabinets, pillars, steps, ramps or vehicle-lift posts.
2. Gather the Basic Installation Equipment
One benefit of modular garage flooring is that installation normally requires fewer materials than a glued floor coating or permanently bonded tile. You do not need adhesive, mixing containers, notched trowels or a curing period when the product is approved for loose laying.
Planning and cleaning equipment
- Tape measure
- Pencil and paper
- Chalk line or removable floor marker
- Long straightedge
- Broom and vacuum
- Mop and suitable degreasing cleaner
- Clean cloths or absorbent material
Fitting equipment
- Rubber mallet where permitted
- Knee protection
- Work gloves
- Safety glasses
- Manufacturer-approved tile cutting equipment
- A stable cutting surface
- Matching ramp edges or entrance edging
Cutting safety
Tile cutting should be handled by a competent adult or flooring installer using the tool recommended for the specific tile. Follow the tool manufacturer’s safety instructions, support the tile on a stable surface and keep hands away from the cutting path. General guidance on handling sharp cutting equipment is available from the external Canadian Centre for Occupational Health and Safety.
3. Measure the Garage and Calculate the Tile Quantity
Accurate measurement helps prevent delays, excessive waste and unexpected colour differences between separate orders. Measure the longest internal length and width of the garage in metres. Multiply the two measurements to calculate the basic floor area.
For example, a garage measuring 6 metres long and 3 metres wide has an area of 18 square metres:
6 m × 3 m = 18 m²
Measure alcoves, storage sections and side passages separately, then add those areas to the main total. Permanent cupboards that reach the floor can normally be excluded if the tiles will finish neatly around them. Moveable cabinets and equipment should not automatically be excluded because the floor may be visible when the garage layout changes.
Add an allowance for perimeter cuts, damaged pieces and future repairs. A simple rectangular garage generally produces less waste than an area containing pillars, curved walls, steps or multiple doorways. The correct allowance depends on the room and tile dimensions, but it is better to keep several matching tiles than to discover later that the original colour batch is unavailable.
Check the coverage stated on the selected product page rather than estimating the quantity from photographs. Tile sizes and the number of tiles required per square metre vary between products, so calculate the order using the exact product specifications.
When using two or more colours, calculate each colour separately according to your pattern. Create a simple grid on paper and mark borders, parking zones or contrasting sections before placing the order. This reduces the risk of changing the design halfway through installation.
4. Prepare the Existing Concrete Floor
Floor preparation is less complicated than it is for bonded flooring, but it still affects the appearance and stability of the completed project. Dirt trapped below a tile can create an uneven spot, while a raised concrete edge can stop the locking joints from connecting correctly.
Empty the garage
Remove the vehicle, shelving that can be moved, boxes, loose equipment and floor-standing items. A clear room allows you to inspect the complete slab and maintain straight installation lines. It is usually easier to complete the main floor in one continuous operation than to move objects repeatedly from one side to the other.
Remove loose dirt and debris
Sweep the floor thoroughly and vacuum around walls, corners, control joints and door tracks. Pay attention to small stones, screws and hardened debris. Even a small object can create a visible high point below a fitted tile.
Clean oily or greasy areas
Use a cleaner that is suitable for the concrete and the type of contamination present. Follow its instructions, rinse where required and remove the resulting residue. Although the tiles are not being glued down, leaving oil below the system can create odours, dirt or maintenance problems later.
Allow the floor to dry
Do not trap ordinary cleaning water under solid tiles. Allow the surface to dry properly before beginning the layout. Persistent moisture that returns after cleaning should be investigated because it may indicate a drainage, plumbing or building problem.
Correct significant defects
Remove loose concrete and address deep holes, unstable cracks and severe high spots with a suitable repair method. Respect structural or movement joints and obtain technical advice when the slab is actively moving. Interlocking tiles can accommodate ordinary cosmetic imperfections, but they should not be expected to stabilise a damaged slab.
For additional preparation and maintenance information, read our internal PVC floor tile installation and cleaning guide.
5. Allow the Tiles to Adjust to the Garage Conditions
Store the unopened or neatly stacked tiles flat in the installation area for the period recommended by the supplier. This allows the flooring to adjust to the temperature of the garage before it is connected. Avoid placing the tiles beside heaters, in strong sunlight or against a very hot garage door.
Inspect the products before fitting them. Confirm that the tile type, colour, finish and locking profile match the order. Modular products, particularly products containing recycled material, can show small shade or surface variations. Mix tiles from different packs across the installation where recommended rather than completing one visible section from a single pack.
Do not install damaged or incorrectly supplied pieces and plan to use cut pieces only around the perimeter. Complete tiles should normally form the main vehicle and walking areas wherever possible.
6. Plan the Layout Before Connecting the Tiles
A successful guide on how to install interlocking garage tiles must address the layout, because the first rows influence every row that follows. Starting without measuring can leave a narrow strip at one wall, an uneven pattern at the garage entrance or joints that gradually move out of alignment.
Choose the visual direction
Decide whether the tile pattern should run parallel to the garage door, the longest wall or the main vehicle direction. For a single-colour floor, joint alignment is usually the main visual concern. With a chequered layout, border or parking-bay design, mark the entire colour sequence before installation.
Establish a reference line
Measure from a dependable wall or from the garage-door opening and create a straight reference line. Do not assume that walls are perfectly square. Compare measurements at several points and use the line, rather than an uneven wall, to keep the first rows straight.
Check the perimeter cuts
Lay several loose tiles across the width and length without connecting them permanently. This dry layout reveals the approximate size of the finishing pieces. Adjust the starting position where necessary so that you do not create an impractically narrow strip along a prominent wall.
Confirm the locking orientation
Interlocking profiles differ. Some tiles have clearly defined male and female sides, while others use puzzle-shaped or concealed connections. Identify the correct direction before laying the first tile. Avoid rotating individual pieces unless the product design permits rotation, because the pattern or connection may no longer match.
Layout tip: Complete one small test section before covering the room. Confirm that the connections close properly, the surface pattern faces the correct direction and the planned starting line produces balanced perimeter cuts.
7. How to Install Interlocking Garage Tiles Step by Step
Place the first tile
Position the first complete tile at the chosen starting point with its locking edges facing in the correct direction. Align it with the reference line rather than pushing it tightly against the wall. Keep the perimeter space specified for the product so that the modular floor is not trapped between fixed structures.
Connect the second tile
Match the locking edge of the next tile with the first one. Apply even downward pressure along the joint until the connection is level and fully engaged. Where the supplier permits it, a clean rubber mallet can help seat a resistant joint gently. Do not strike the centre of a tile unnecessarily or force mismatched edges together.
Complete the first straight row
Continue adding complete tiles along the reference line. Recheck alignment after every few tiles rather than waiting until the entire floor is fitted. A small error in the first row can become a much larger offset at the opposite end of the garage.
Build the next rows
Start the second row from the same side and connect each new tile to both the tile beside it and the tile in the previous row. Work methodically across the garage. Avoid creating several disconnected floor sections because separate sections can be difficult to align when they meet.
Check every joint
Run your hand across the connected joints and look for raised corners or partially engaged locks. Correct a problem as soon as it appears. Continuing over an incomplete joint can place the following rows out of line and make the problem harder to reach.
Maintain the planned pattern
When two or more colours are being used, compare each row with the layout drawing before connecting it. Keep unused colours in separate stacks and inspect every tile before fitting it. Correcting a misplaced colour is easier before the surrounding rows have been completed.
Stop before the perimeter
Install complete tiles throughout the open central area first. Leave the final row beside walls, doors, pillars and cabinets until the main grid is straight. Measure each finishing piece individually because wall dimensions can change from one end of the room to the other.
Fit the final perimeter pieces
Transfer the measurements to each tile while accounting for the required perimeter space. Have the tiles cut with the approved equipment and fit the trimmed edges toward the wall or fixed object. The factory locking edge should face the completed floor so it can connect properly to the preceding row.
8. Finish Doorways, Walls and Fixed Obstacles
Garage-door entrance
The front entrance is one of the most visible and heavily used parts of the floor. Plan it carefully so that the final row remains straight when the garage door is open. Compatible ramp edging can create a neater transition, reduce the exposed vertical edge and make it easier for wheels to move onto the tiled surface.
Do not allow the flooring to obstruct the operation of the garage door, weather seal, drainage channel or door track. Open and close the door manually after completing the entrance to confirm that adequate clearance remains.
Walls and skirting
Leave the product-specific perimeter clearance instead of fastening every tile tightly against the wall. The gap may be covered with suitable trim or skirting where this is compatible with the system. Trim should not clamp a floating installation so firmly that normal movement becomes impossible.
Pillars and cabinet legs
Measure around each fixed object separately and create a neat perimeter rather than forcing the modular floor below an immovable structure. Maintain the required clearance around pillars, structural posts, lift supports and permanently fixed cabinets.
Drains and inspection points
Keep drains, access covers and service points functional. Do not permanently conceal an area that may need inspection or maintenance. Where regular water is expected, confirm whether a solid tile or open-grid drainage tile is the correct product for the garage.
9. Check the Floor Before Returning the Vehicle
Walk across the completed floor and inspect it in daylight or bright overhead lighting. Check the garage entrance, wheel paths, corners and trimmed perimeter pieces. Every locking joint should be connected, and there should be no unexplained raised edges or loose debris below the surface.
Clean the top of the tiles to remove installation dust. Follow the product’s cleaning instructions and avoid harsh chemicals that have not been approved for the tile material. Because no glue needs to cure in an approved loose-lay installation, the floor may often be used soon after completion, but the supplier’s instructions should determine the correct waiting period.
When returning a vehicle to the garage:
- Drive slowly across newly fitted entrance edging.
- Check that the edging remains properly connected.
- Avoid aggressive wheel spinning or unnecessary stationary steering.
- Inspect the floor after the first few vehicle movements.
- Investigate movement rather than assuming that it will settle automatically.
Routine cleaning
Sweep or vacuum loose sand and grit regularly, especially near the garage entrance. Mop solid tiles using a suitable diluted cleaner and avoid leaving excessive water standing on the floor. Deal with oil, coolant or chemical spills promptly according to the tile supplier’s care instructions.
Periodic inspections
Check entrance rows, wheel paths and areas below frequently moved equipment. A major advantage of a modular floor is that individual sections may be accessible for inspection or replacement. Keep spare tiles from the original order in a flat, protected storage area for possible future repairs.
10. Common Garage Tile Installation Mistakes
| Mistake | Why It Causes Problems | Better Approach |
|---|---|---|
| Assuming every tile can be installed without glue | Some products or demanding applications require adhesive or another installation method. | Confirm the product specification and garage conditions before ordering. |
| Installing over loose dirt | Debris can create raised points, movement or noise below the tiles. | Sweep, vacuum and inspect the complete floor first. |
| Starting against an uneven wall | The rows may gradually move out of alignment. | Use measured reference lines and check them regularly. |
| Forcing incompatible locking edges | This can damage the joints and create raised corners. | Identify the locking orientation before starting. |
| Ignoring perimeter clearance | A tightly trapped floor may have insufficient room for normal movement. | Follow the expansion-space instruction for the selected tile. |
| Cutting every edge piece to one measurement | Garage walls are not always straight or square. | Measure each perimeter section individually. |
| Covering a serious moisture problem | Trapped moisture may create odour, hygiene or building-related problems. | Identify and correct the moisture source before installation. |
| Ordering the exact measured quantity | There may be no allowance for cutting waste or future replacement. | Add an appropriate allowance based on the room layout. |
| Using incorrect entrance edging | The exposed edge may look unfinished or move under wheels. | Use edging designed for the selected tile system. |
Frequently Asked Questions
Can interlocking garage tiles really be installed without glue?
Yes, certain interlocking garage tiles are designed to form a stable loose-lay system through their locking edges. However, the product must be approved for your garage conditions. Adhesive or professional installation may be recommended for heavy commercial use, unusual vehicle movement, direct sunlight, temperature extremes or other demanding conditions.
Can I install the tiles directly over concrete?
Many modular garage tiles can be fitted over stable concrete after the floor has been cleaned and serious defects have been corrected. Loose concrete, active cracks, severe unevenness and persistent moisture should be investigated before installation.
Does the concrete have to be perfectly level?
The slab does not always need to be visually perfect, but significant high spots, deep depressions and unstable areas can affect the result. The flooring follows the general profile below it, so important irregularities should be corrected rather than covered.
Where should I start laying garage tiles?
The correct starting position depends on the tile system, garage entrance, room dimensions and planned pattern. Establish a straight reference line, test the anticipated perimeter cuts and follow the locking orientation supplied with the product.
Should I start in the centre or at the garage door?
Either method may be appropriate for a particular system. Starting from a centre line can balance perimeter cuts, while planning from the garage opening can produce a cleaner entrance. The important step is to dry-plan several rows before connecting the complete floor.
Do I need an expansion gap around the walls?
Most floating modular systems require some perimeter clearance around walls and immovable objects, but the correct space differs by product. Use the dimension supplied by the tile manufacturer rather than applying one measurement to every type of garage tile.
How do I cut tiles around pillars and cabinets?
Measure every obstacle carefully and mark the required perimeter clearance. Cutting should be completed by a competent adult or flooring installer using equipment approved for the specific tile. Keep the factory locking edges facing the main floor wherever possible.
Can I park a car on the floor immediately?
A glue-free system does not normally require adhesive-curing time, but the product instructions still control when the floor may be used. Complete all edging, inspect every joint and confirm that the system is approved for vehicle loading before returning the car.
Can damaged garage tiles be replaced later?
One advantage of modular flooring is that damaged sections can often be disconnected and replaced. The exact process depends on the locking design and the damaged tile’s position. Keep several unused tiles from the original colour batch for future repairs.
How long does a DIY garage tile installation take?
The installation time depends on garage size, floor preparation, pattern complexity, perimeter cutting and the number of fixed obstacles. A clear rectangular garage with a simple single-colour layout will normally be faster than a multi-colour floor containing pillars, drains and fitted cabinets.
Final Advice on How to Install Interlocking Garage Tiles
The best result begins before the first tile is connected. Select a product that is suitable for vehicle use, measure the garage accurately, prepare the concrete, plan the layout and confirm the direction of the locking system. Complete tiles should form the main floor, while carefully measured pieces finish the perimeter.
Do not treat a modular floor as a way to conceal serious concrete damage or uncontrolled moisture. Correct important site problems first and follow the instructions for the particular product. Where the garage has commercial traffic, vehicle lifts, direct sunlight, heavy machinery or unusual loading, request product-specific advice before choosing a glue-free installation.
Once you understand how to install interlocking garage tiles correctly, the project becomes a controlled sequence of preparation, measuring, alignment, connection and finishing. Taking time over the first rows and entrance edge will usually make a greater difference than trying to complete the floor as quickly as possible.
Need Help Choosing Garage Tiles?
Speak to PVC Floor Tile about your garage dimensions, vehicle use, preferred colour and existing concrete condition. We can help you identify a suitable modular flooring option and calculate the quantity required for your project.
Contact PVC Floor Tile