
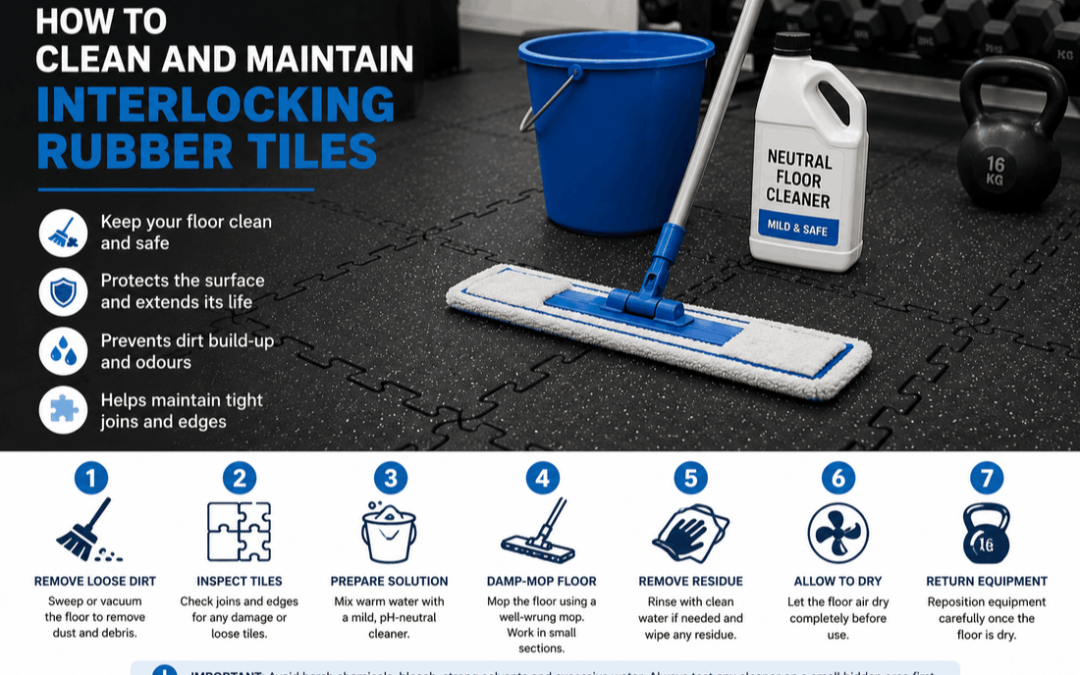
How to clean interlocking rubber tiles depends on the amount of traffic, the type of dirt present and the environment in which the flooring is installed. Regular sweeping, controlled damp cleaning and quick spill removal can help preserve the floor while reducing the build-up of grit around textured surfaces and joining edges. Customers planning a new installation can browse our modular interlocking rubber floor tiles before selecting a surface for gyms, workshops, schools or equipment rooms.
Rubber flooring is often chosen because it is practical and relatively simple to maintain, but it should not be treated as though every cleaning product is safe. Strong solvents, excessive water and oily treatments may affect the surface, joins or supporting floor.
The best maintenance routine begins with preventing damage. Remove grit before it is ground into the floor, respond to spills promptly and inspect the connected edges whenever heavy equipment is moved.
This guide explains a seven-step cleaning process, suitable tools, products to avoid and long-term maintenance practices for connected rubber flooring.
How to Clean Interlocking Rubber Tiles Safely
The safest method is to remove loose grit first, use a compatible mild cleaner with a damp mop, work in manageable sections and allow the surface to dry fully. When learning how to clean interlocking rubber tiles, avoid flooding the floor or using strong chemicals unless the exact product specification confirms that they are suitable.
Why Regular Rubber Tile Cleaning Matters
Dust, sand and small stones may seem harmless, but they can act like abrasive particles when people walk across them repeatedly. In a busy gym, workshop or school facility, this grit may collect around equipment feet and within the visible joining lines.
Cleaning also helps facility managers notice problems earlier. A separated connection, raised edge or damaged tile may be easier to identify when the floor is free from clutter and dirt.
Regular care does not mean using large amounts of water or aggressive chemicals. In many environments, frequent dry cleaning and occasional controlled damp cleaning provide a more practical routine.
Remove surface build-up
Routine care helps prevent dust, marks and residue from making the floor look neglected.
Respond to spills promptly
Removing water, sweat and other spills reduces the chance of slippery or contaminated areas.
Identify damage early
Cleaning provides an opportunity to check joins, exposed edges and compressed equipment zones.
Cleaning Tools to Prepare
The cleaning process is easier when the correct tools are ready before equipment is moved. Most routine maintenance does not require specialised machinery.
- Soft-bristle broom
- Vacuum with a suitable floor attachment
- Microfibre mop
- Clean bucket
- Warm water
- Compatible neutral cleaner
- Soft nylon brush
- Absorbent cloths
- Dry mop or clean towels
- Warning sign for wet areas
- Protective gloves where required
- Record sheet for damaged tiles
Use a soft brush rather than a wire brush or highly abrasive scrubbing pad. A vacuum attachment should move smoothly across the floor without pulling at exposed edges.
Seven Steps for Cleaning Interlocking Rubber Flooring
Remove portable equipment and loose items
Move lightweight benches, boxes, mats and portable exercise equipment out of the section being cleaned. Heavy machinery should not be dragged across the rubber because this may damage the surface or separate tile joins.
Sweep or vacuum loose dirt
Remove grit, hair, dust and small particles before adding water. Work around walls, equipment feet and joining lines where dirt commonly collects.
Inspect joins and exposed edges
Check for separated connections, raised sections, tears, compression or movement. Correct minor alignment problems before damp cleaning and record tiles that may need replacement.
Prepare a mild cleaning solution
A key part of understanding how to clean interlocking rubber tiles is choosing a cleaner that is compatible with the exact product. Follow the manufacturer’s dilution instructions and test the solution on a small hidden area first.
Damp-mop in manageable sections
Wring out the mop before it touches the floor. Clean one section at a time instead of pouring solution across the full room. Use a soft nylon brush for textured areas where required.
Remove residue and allow the floor to dry
Do not leave cleaning residue, pools of water or wet joins behind. Use a clean damp mop where rinsing is necessary and improve airflow until the floor is fully dry.
Return equipment carefully
Replace benches and machines only after the flooring is dry. Lift equipment where possible rather than dragging it, then confirm that all feet remain stable and that no joins have opened.
Sweeping Versus Vacuuming
Both methods can work well, but the best option depends on the room. A soft broom is convenient for open spaces, while a vacuum can be more effective around textured surfaces and equipment.
Choose a vacuum head without sharp edges. Avoid using a rotating attachment that catches exposed puzzle connections or pulls at perimeter pieces.
In commercial gyms or school facilities, vacuuming may help remove hair and fine dust that a broom pushes between equipment stations.
Choosing a Suitable Cleaning Product
A mild, neutral cleaning product is usually a sensible starting point, but compatibility should be confirmed for the exact flooring. Different rubber compounds and recycled materials may respond differently.
More cleaner does not necessarily produce a cleaner floor. An overly concentrated solution can leave residue that attracts dust or changes the way the surface feels underfoot.
Test first: Apply a small amount of diluted cleaner to an inconspicuous tile. Allow it to dry and check for discolouration, softening, residue or surface changes before cleaning the complete floor.
Products and Methods to Avoid
Do not assume that household or industrial chemicals are automatically safe for rubber flooring. The wrong product may affect the colour, texture, joins or adhesive beneath a secured installation.
Avoid unless specifically approved
- Strong solvents
- Undiluted degreasers
- Harsh bleach solutions
- Petrol or paraffin cleaners
- Acidic cleaning products
- Oily polish or wax
- Highly abrasive powders
- Wire brushes
Use safer cleaning habits
- Follow product dilution instructions
- Use a soft broom or vacuum
- Test cleaners in a hidden area
- Damp-mop rather than flood
- Remove residue thoroughly
- Dry the floor before use
- Clean spills promptly
- Inspect joins during cleaning
Why Excessive Water Should Be Avoided
Interlocking tiles connect closely, but the assembled floor should not automatically be treated as watertight. Water may pass through joins, perimeter gaps or damaged sections.
Moisture trapped between the rubber flooring and the supporting floor can create unpleasant odours and make the room difficult to maintain. It may also hide a separate moisture problem in the concrete.
Use a well-wrung mop and clean small sections at a time. Where water has entered beneath the floor, lift an accessible section and allow both surfaces to dry completely before reconnecting the tiles.
Cleaning Textured Rubber Tile Surfaces
Textured finishes may hold dust more readily than smooth surfaces. Vacuum across the texture from different directions before damp cleaning.
For stubborn residue, use a soft nylon brush and a compatible diluted cleaner. Apply gentle pressure rather than aggressive scrubbing.
After brushing, remove the loosened dirt with a damp mop and dry the section. Do not allow dirty cleaning solution to settle back into the pattern.
Cleaning Between Tile Joins
Visible puzzle connections and hidden-lock systems both require inspection. Dust may collect along the joins, particularly near doorways and exercise stations.
Vacuum the connection lines using a smooth attachment. Do not force sharp tools into the joins because this may tear or deform the locking edges.
A join that repeatedly separates should be investigated rather than simply pushed back together during every cleaning session. Check the room layout, supporting floor and nearby equipment movement.
Removing Sweat and Gym Residue
In gyms, sweat should be wiped up promptly instead of being allowed to dry on the flooring. High-touch sections around benches, racks and stretching areas may require more frequent damp cleaning.
When deciding how to clean interlocking rubber tiles in a gym, consider how many users enter the room each day and how often equipment moves between stations. Busy commercial facilities may need daily dust removal and scheduled damp cleaning.
Do not use oily products to make the surface look darker or shinier. Residue may attract dirt and affect underfoot grip.
Cleaning Workshop Dirt and Spills
Workshops can introduce metal particles, grease, oil, dust and chemical residue. These substances should be removed according to the product involved and the flooring specification.
Sweep or vacuum sharp particles before people walk over them repeatedly. Blot liquid spills with an absorbent material rather than spreading them across a wider section.
Chemical resistance varies between rubber products. Where regular oil, solvent or fuel exposure is expected, confirm compatibility before installing the floor.
Removing Marks From Equipment Feet
Stationary machines may leave pressure marks or trapped dirt around their support feet. Clean these sections whenever equipment can be moved safely.
Heavy machines should be lifted using appropriate handling equipment. Dragging them may tear the floor or separate connected sections.
Check whether narrow feet need suitable load-distribution pads. These pads should remain stable and should not create raised edges in walking routes.
Cleaning Beneath Loose-Laid Tiles
Routine cleaning normally takes place on the visible surface, but sections may occasionally need to be lifted where moisture, odours or contamination are suspected.
Start at an accessible perimeter edge and disconnect the tiles carefully. Number or photograph the sections if this will make reinstallation easier.
Clean the supporting floor separately, allow it to dry and inspect it for cracks or moisture. Reconnect the tiles only when both the rubber and subfloor are completely dry.
For a stable installation, follow our guide to installing rubber tiles correctly over concrete.
How Often Should Rubber Tiles Be Cleaned?
There is no single cleaning schedule for every facility. Frequency should be based on traffic, activities, footwear, spills and the amount of outside dirt entering the room.
| Application | Routine care | Additional attention |
|---|---|---|
| Home gym | Sweep or vacuum regularly and damp-clean when required. | Clean sweat and spills after training. |
| Commercial gym | Remove loose dirt daily and follow a scheduled damp-cleaning routine. | Inspect joins, benches and equipment zones frequently. |
| School gym | Clean according to session frequency and facility requirements. | Check high-traffic entrances and shared equipment areas. |
| Workshop | Remove grit and sharp particles frequently. | Respond immediately to oil or chemical spills. |
| Equipment room | Vacuum around machines and damp-clean accessible sections. | Inspect pressure points beneath narrow equipment feet. |
| Storage area | Sweep regularly and remove packaging debris. | Check beneath cabinets and heavy shelving where practical. |
Maintaining Tile Joins and Perimeter Edges
Maintenance is not limited to washing the surface. Connected edges should remain properly engaged, and exposed perimeter sections should remain flat.
Inspect doorways, ramps and areas where equipment changes direction. These locations often receive concentrated foot and rolling traffic.
Where a tile repeatedly lifts or shifts, identify the cause. The issue may relate to an uneven supporting floor, an incorrect perimeter gap, damaged connections or movement from nearby equipment.
Replacing Damaged Rubber Tiles
One benefit of modular flooring is that a damaged section may be replaceable without removing the complete floor. Access usually begins from the nearest open perimeter edge.
Disconnect neighbouring sections carefully until the damaged tile can be removed. Clean and inspect the supporting floor before installing the replacement.
Keep several spare tiles from the original order where possible. Colour and surface appearance may vary between manufacturing batches or after years of use.
Managing Trapped Moisture and Odours
An unpleasant smell does not always mean that the rubber itself is damaged. Moisture, dirty water or organic residue may be trapped beneath the floor.
Lift the affected sections, clean both surfaces and investigate the source of the moisture. A leaking pipe, wet concrete or recurring spill should be resolved before the flooring is reinstalled.
Do not reconnect damp tiles over a wet subfloor. Improving ventilation and allowing sufficient drying time are important parts of the maintenance process.
Cleaning Safety in Busy Facilities
Clean one controlled section at a time so users do not walk through a wet area. Use suitable signs or temporarily restrict access where necessary.
Do not return gym equipment, shelving or portable furniture until the floor is dry. Check that no cleaning residue remains around doorways and transitions.
For broader workplace information, review the HSE’s guidance on preventing slips and trips.
Long-Term Rubber Tile Maintenance Checklist
- Remove grit before damp cleaning
- Clean spills promptly
- Use a compatible mild cleaner
- Test new products in a hidden area
- Avoid excessive cleaning solution
- Do not flood the floor
- Dry the surface before reopening
- Inspect puzzle or hidden joins
- Check exposed perimeter edges
- Examine equipment pressure points
- Lift sections where moisture is suspected
- Replace torn or badly damaged tiles
- Keep spare tiles from the same order
- Record recurring maintenance problems
Common Cleaning Mistakes
| Mistake | Possible problem | Better approach |
|---|---|---|
| Mopping before removing grit | Dirt may be spread across the surface or pressed into the texture. | Sweep or vacuum before adding moisture. |
| Using too much cleaner | Residue may remain and attract more dirt. | Follow the recommended dilution ratio. |
| Flooding the floor | Water may enter through joins and collect underneath. | Use a well-wrung damp mop. |
| Using aggressive solvents | The rubber surface or colour may be affected. | Use only a compatible product tested first. |
| Dragging equipment | Tiles may tear, separate or move out of alignment. | Lift equipment using appropriate handling methods. |
| Ignoring separated joins | The edge may continue to move or become raised. | Investigate and correct the cause promptly. |
| Replacing equipment too soon | Moisture may remain trapped beneath equipment feet. | Wait until the floor is fully dry. |
Frequently Asked Questions
How to clean interlocking rubber tiles without damaging them?
Remove loose dirt first, use a diluted compatible cleaner, damp-mop small sections and allow the floor to dry fully. Avoid strong solvents and excessive water.
Can I mop interlocking rubber tiles?
Yes. Use a well-wrung damp mop rather than pouring water across the floor.
Can bleach be used on rubber floor tiles?
Do not use bleach unless the exact product manufacturer confirms that the concentration and method are suitable.
Can rubber flooring be steam-cleaned?
Steam should not be used unless the flooring specification clearly permits it. Heat and moisture may affect certain products or installations.
How do I remove dirt from textured rubber tiles?
Vacuum from different directions, apply a compatible diluted cleaner and use a soft nylon brush where necessary.
Should I clean underneath interlocking tiles?
Routine cleaning normally focuses on the top surface. Lift sections when moisture, contamination or odours are suspected underneath.
How can damaged rubber tiles be replaced?
Begin at the nearest accessible edge, disconnect enough tiles to release the damaged section and install a suitable replacement.
How often should gym rubber tiles be cleaned?
The frequency depends on daily users, activity levels and spills. Commercial facilities generally require more frequent cleaning than home gyms.
Final Advice for Cleaner, Longer-Lasting Rubber Floors
Understanding how to clean interlocking rubber tiles starts with a simple rule: remove dry dirt before adding water. Grit, dust and loose particles should be swept or vacuumed regularly so they do not collect around equipment or joining edges.
Use a mild cleaner that is compatible with the exact rubber product, follow the correct dilution instructions and test it on a hidden section. Damp-clean manageable areas instead of flooding the room.
Allow the surface to dry fully before users and equipment return. Inspect connections, perimeter edges and pressure points as part of every scheduled maintenance session.
A consistent routine can help maintain the appearance and practicality of connected rubber flooring while making it easier to identify damage before it becomes a larger problem.
Need Help With Rubber Tile Care?
Send PVC Floor Tile photographs of your flooring, details of the room and information about the dirt or spill involved. Our team can help you identify a practical maintenance approach and suitable replacement tiles where required.
Contact Us