
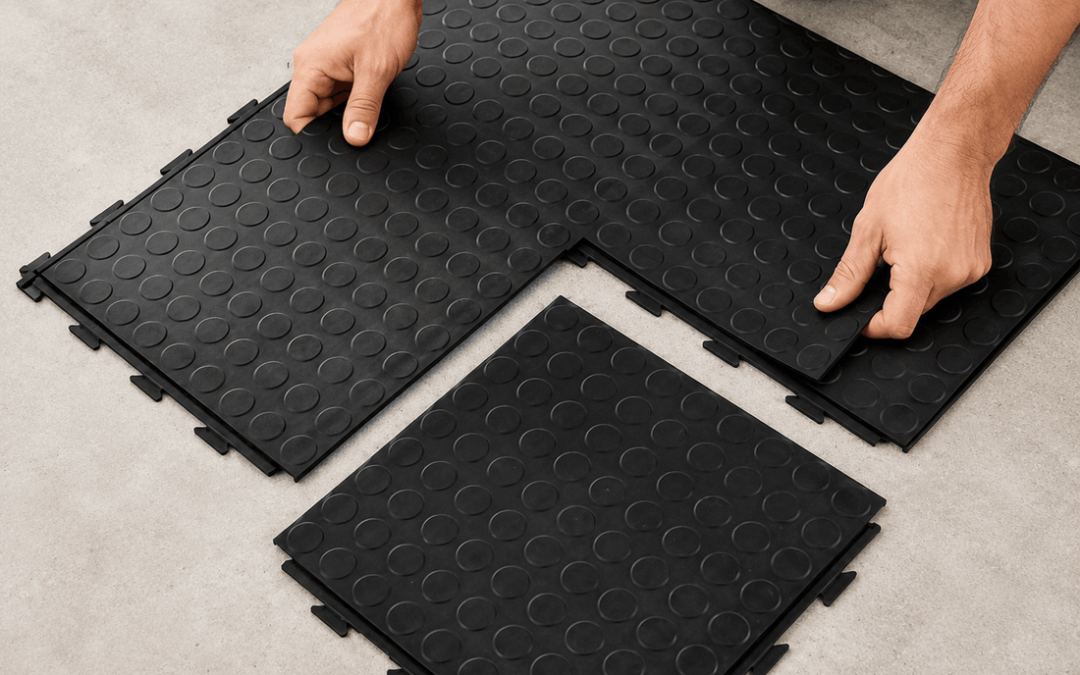
Hidden interlocking rubber tiles combine modular installation with a concealed joining design that reduces the appearance of exposed puzzle-style edges. When properly aligned, the tiles can create a cleaner and more continuous-looking floor while retaining the practical advantages of individual replaceable sections. Explore our range of hidden interlocking rubber tiles for workshops, commercial interiors, utility rooms and selected multipurpose spaces.
Traditional puzzle tiles display their interlocking tabs around the perimeter of each tile. Hidden-lock tiles use a joining system positioned beneath or partly concealed by the upper surface, making the individual tile outlines less visually dominant.
This can be useful where a modular floor is required but the customer wants a neater appearance. The finished surface should, however, be described as seamless-looking rather than completely seamless because faint tile lines may remain visible under certain lighting or after prolonged use.
This guide explains how concealed joins work, their main advantages, suitable applications, installation considerations, cleaning requirements and situations where exposed-lock tiles may be more practical.
What Are Hidden Interlocking Rubber Tiles?
Hidden interlocking rubber tiles are modular floor sections with connecting edges designed to sit beneath or within the tile profile. This reduces the visible puzzle-edge appearance and helps produce a cleaner, more unified floor.
How Does the Hidden Interlocking System Work?
Each tile has connecting sections positioned around its edges. Instead of extending outward as large visible puzzle tabs, the locking mechanism connects below or within the edge profile.
During installation, one tile is positioned beside another and the connecting points are carefully aligned. Pressure is then applied along the join until the sections engage and the upper surfaces sit at a consistent height.
The exact joining method varies between products. Some hidden-lock tiles require firm hand pressure, while others may be seated using a rubber mallet and a protective block. Always follow the instructions supplied for the exact product.
Reduced puzzle-edge appearance
The joining tabs are positioned below the visible walking surface instead of forming a large exposed outline.
Individual floor sections
The floor remains made from separate tiles, allowing selected sections to be lifted or replaced where appropriate.
Cleaner visual finish
Correctly aligned joins help the surface appear more continuous than a traditional exposed puzzle layout.
Hidden Joins Versus Visible Puzzle Joins
Both joining systems can produce a practical modular floor, but they differ in appearance, installation and everyday management.
| Feature | Hidden interlocking tiles | Visible puzzle tiles |
|---|---|---|
| Join appearance | Connection is largely concealed beneath the visible surface. | Puzzle tabs remain clearly visible around each tile. |
| Finished look | Cleaner and more continuous-looking when properly aligned. | Stronger modular or workshop-style appearance. |
| Installation | Requires careful alignment so the concealed locks engage correctly. | Tabs are easy to see during assembly. |
| Replacement | A selected tile may be replaceable, but neighbouring sections may need to be lifted. | The exposed connection may make the joining direction easier to identify. |
| Best visual setting | Commercial rooms, display areas and interiors where appearance matters. | Workshops, temporary floors and practical utility spaces. |
Benefit 1: A Cleaner, More Continuous-Looking Floor
The main visual advantage is the reduction of exposed puzzle-shaped outlines. This can make the installed floor look less busy, particularly when all tiles use the same colour and surface texture.
A cleaner appearance can be useful in customer-facing rooms, reception support areas, studios, display sections and commercial interiors where the floor forms part of the overall presentation.
Accurate description: Use “seamless-looking” or “continuous-looking” rather than claiming that the floor is completely seamless. The installation still consists of separate modular tiles.
Benefit 2: Modular Installation
Hidden-lock tiles retain the practical modular format of interlocking flooring. Individual tiles can be handled, positioned and connected without transporting one large continuous sheet across the room.
This can make the material easier to plan around columns, walls, doorways and fixed equipment. Perimeter sections can be measured and cut to follow the room layout.
Many installations may not require permanent adhesive, but that should not be treated as a universal rule. Large areas, heavy trolley traffic, exposed edges or unusual operating conditions may require additional securing.
Benefit 3: Localised Tile Replacement
When one section becomes badly damaged, it may be possible to replace the affected tile instead of removing the entire floor.
The replacement process depends on the room layout and joining direction. Tiles near a wall are normally easier to access than sections positioned in the centre of a large installation.
Keep spare tiles from the original order where possible. Product batches can vary slightly in colour or finish, especially after the installed floor has been exposed to regular cleaning and traffic.
Benefit 4: Easier Room Planning
Modular dimensions make it easier to calculate the number of tiles needed for a rectangular floor. The room can be divided into rows, allowing installers to plan perimeter cuts and avoid unnecessary narrow strips.
Measure the room in more than one place because walls are not always perfectly straight. Allow for offcuts and future replacement sections when calculating the final quantity.
Plan the Complete Layout Before Connecting the Tiles
A dry layout helps identify the best starting point, final row width, doorway transitions and positions of all perimeter cuts before the hidden locks are fully engaged.
Benefit 5: Practical Surface Protection
Rubber tiles may help protect a compatible supporting floor from routine pedestrian movement, scuffs and selected equipment activity.
The exact level of protection depends on the tile thickness, rubber composition, base condition and type of equipment used. A thin modular tile should not automatically be treated as a substitute for specialist impact flooring under extremely heavy machinery.
Where broader removable floor protection is required, compare other rubber flooring and floor-protection options before choosing one system for the complete project.
Best Use 1: Commercial Interiors
Hidden interlocking rubber tiles can work well in commercial interiors where a practical modular floor is needed without the strong puzzle-edge appearance of traditional connecting tiles.
Possible areas include staff workrooms, back offices, service counters, display spaces, equipment rooms and selected retail support areas.
In customer-facing environments, the subfloor and perimeter finishing require additional attention. Uneven cuts, poorly aligned joins and unfinished doorway edges can reduce the visual benefit of the concealed-lock design.
Best Use 2: Workshops and Tool Rooms
A hidden-lock rubber floor can give a workshop or tool room a cleaner appearance while preserving modular access to the supporting floor.
The tiles may be suitable for pedestrian areas, workbench sections, tool storage rooms and controlled maintenance spaces. Confirm suitability where welding, hot work, sharp metal fragments, oils or aggressive chemicals are present.
Possible workshop applications
- Workbench zones
- Tool storage areas
- Pedestrian routes
- Assembly spaces
- Maintenance rooms
- Clean technical work areas
Conditions requiring confirmation
- Welding and hot work
- Heavy machinery
- Oil contamination
- Sharp metal waste
- Frequent chemical spills
- Forklift traffic
Best Use 3: Home Training and Multipurpose Rooms
A home training room may benefit from a modular floor that can be installed in rows and replaced in localised sections.
Hidden joins can create a less visually busy surface than large puzzle edges. The suitability of the tile still depends on the type of exercise, equipment weight and expected impact.
Protect the floor from concentrated equipment feet where necessary. Very heavy free weights and repeated dropping may require a thicker specialist gym tile rather than a general-purpose hidden-lock product.
Best Use 4: Studios and Activity Rooms
Studios, classrooms and multipurpose activity rooms often need flooring that looks neat but remains practical to repair or reconfigure.
A concealed joining system can support a clean room design while the modular layout makes it easier to work around walls and permanent fittings.
Confirm that the surface texture, firmness and maintenance process suit the activities performed in the room. Not every rubber tile is designed for dance, sport or children’s play.
Best Use 5: Retail and Display Areas
Hidden join rubber tiles may be considered for selected product displays, exhibition areas and covered retail spaces where the floor needs a modular format with a cleaner visual finish.
Use one consistent colour where the objective is a continuous-looking surface. Contrasting colours can create attractive zones but will make the tile layout more visible.
Doorways, exposed edges and transitions into neighbouring floor finishes should be secured and finished carefully.
Best Use 6: Utility and Storage Rooms
Storage rooms, equipment areas and commercial utility spaces may benefit from a floor that is easy to divide into manageable sections.
The concealed joins can make the floor appear less industrial than ordinary puzzle tiles while retaining the convenience of modular replacement.
Check trolley-wheel size and load. Small, hard wheels carrying heavy stock can apply concentrated pressure to joins and tile edges.
Where Hidden Interlocking Rubber Tiles May Not Be Suitable
A hidden-lock design is not automatically the best flooring for every environment. Another system may be more appropriate where drainage, high impact, chemical resistance or specialist electrical properties are required.
Confirm another flooring solution for areas with:
- Constant standing water
- Open drainage requirements
- Permanent outdoor exposure
- Heavy forklift traffic
- Extreme point loads
- Hot metal or welding debris
- Strong chemical exposure
- Special ESD requirements
- Food-production compliance needs
- Unresolved subfloor moisture
- Major floor movement
- Very steep ramps
Hidden Tiles Are Not the Same as ESD Flooring
The word “hidden” describes the interlocking connection. It does not mean that the flooring automatically controls electrostatic discharge.
Electronics assembly rooms and other static-controlled areas require products with appropriate technical resistance values, grounding components, installation methods and ongoing testing.
Do not describe ordinary hidden interlocking rubber tiles as ESD-safe unless the exact product has documented technical specifications supporting that use.
Preparing the Supporting Floor
The floor beneath the tiles should be firm, clean, dry and reasonably level. Remove loose grit, packaging fragments, oil and raised repair material before starting.
Although modular rubber tiles may tolerate small surface imperfections, they should not be used to hide large holes, unstable concrete, serious moisture or major height differences.
| Subfloor condition | Possible effect | Recommended preparation |
|---|---|---|
| Loose dust and grit | Creates raised points and may enter the hidden joins. | Sweep and vacuum thoroughly. |
| Raised concrete repairs | May cause rocking or uneven tile heights. | Level the repair before installation. |
| Oil or grease | Can affect the rubber, cleaning and any fixing system. | Remove contamination appropriately. |
| Open cracks or holes | May leave unsupported sections beneath the tiles. | Assess and repair the base floor. |
| Moisture problem | Moisture may remain trapped beneath the modular surface. | Identify and correct the source first. |
How to Install Hidden Interlocking Rubber Tiles
Check the tile direction and locking system before laying the complete room. Some products have a repeating surface pattern that should face in one consistent direction.
Inspect and clean the subfloor
Remove loose dirt and repair conditions that could prevent the tiles from lying flat.
Measure the complete room
Plan the number of full tiles, perimeter cuts and doorway transitions.
Complete a dry layout
Position several rows without making final cuts so the balance of the room can be checked.
Align the concealed locks
Match the joining sections carefully and ensure the upper surfaces remain level.
Press the join into position
Use the approved method for the product and check that the complete edge is connected.
Measure and cut perimeter tiles
Use a straight edge and sharp flooring knife, making gradual controlled cuts.
Finish exposed transitions
Secure doorway edges and changes between different floor surfaces where required.
Should Installation Begin at the Wall or Centre?
The best starting point depends on the room shape and visual requirements. Starting from one straight wall may simplify installation in a practical workshop or storeroom.
A centred layout may produce more balanced cuts on opposite sides of a customer-facing room. However, it can require additional measuring and cutting.
Complete a dry layout before deciding. Avoid finishing with a very narrow strip that is difficult to connect or keep flat.
Do Hidden Interlocking Tiles Need Adhesive?
Some modular rubber-tile installations may remain loose-laid because the connected floor functions as one large surface. Other projects may require tape, perimeter fixing or adhesive.
Fixing requirements can depend on:
Size and floor shape
Large open areas may behave differently from small rooms enclosed by walls.
People and equipment
Trolleys, turning equipment and concentrated loads can influence tile movement.
Doorways and transitions
Exposed edges may require additional control even when the main floor is loose-laid.
Installation wording: Avoid promising that adhesive is never required. Follow the fixing guidance supplied for the exact tile and application.
How to Cut Hidden Join Rubber Tiles
Measure each perimeter section individually because walls may not be straight. Mark the reverse side where practical and use a metal straight edge to guide the cut.
Several controlled knife passes are normally safer and more accurate than trying to force the blade through the complete tile in one movement.
Leave an appropriate perimeter allowance according to the product guidance. Do not force an oversized section against the wall because pressure can affect neighbouring joins.
How to Replace a Damaged Tile
A damaged tile near the perimeter can usually be reached by lifting the adjacent row from the nearest accessible wall. Work progressively until the affected section is exposed.
Remove the damaged tile, clean the supporting floor and inspect neighbouring locks. Position the replacement in the same direction and reconnect the surrounding sections.
Where a floor has been permanently adhered, local replacement may require a different process and compatible adhesive.
Cleaning Hidden Interlocking Rubber Tiles
Begin by sweeping or vacuuming loose grit. Dirt should not be pushed into the concealed joins during wet cleaning.
Use a mild cleaning product confirmed as suitable for the rubber material. Avoid flooding the floor because excess water may move through perimeter gaps or damaged joins and collect underneath.
Basic maintenance routine:
- Remove loose litter
- Sweep or vacuum grit
- Clean spills promptly
- Use a rubber-compatible cleaner
- Damp-mop controlled sections
- Remove detergent residue
- Inspect the hidden joins
- Check doorway edges
- Look for movement or lifting
- Replace damaged sections
Can Water Pass Through Hidden Tile Joins?
A tight hidden connection can reduce visible gaps, but a modular tile floor should not automatically be described as fully waterproof.
Water may enter around room edges, doorway transitions, damaged joins, floor penetrations or incorrectly connected sections.
Where regular water exposure is expected, the drainage system, supporting floor, perimeter design and cleaning process must all be considered.
Do Concealed Joins Improve Floor Grip?
The joining system mainly affects how the tiles connect and how the finished floor looks. Underfoot grip depends more directly on the upper surface texture, material, contaminants, footwear and maintenance.
Water, oil, dust and detergent residue can influence walking conditions even on a textured rubber floor.
For general workplace guidance, visit the Health and Safety Executive slips and trips guidance website. Businesses should also follow applicable South African workplace requirements and product-specific instructions.
How to Choose the Right Hidden-Lock Rubber Tile
Do not choose the product only because the join is concealed. Compare the complete tile specification and the conditions in the installation area.
| Selection factor | Why it matters | What to confirm |
|---|---|---|
| Material | Rubber and PVC products have different characteristics. | Confirm that the selected tile is rubber. |
| Tile thickness | Thickness influences transitions and possible protection. | Check the exact product specification. |
| Surface texture | The upper pattern affects appearance and cleaning. | Choose coin, stud or another available finish. |
| Traffic | Pedestrians and loaded trolleys apply different forces. | Confirm expected loads and movement. |
| Base floor | Uneven or contaminated floors can affect installation. | Identify required preparation. |
| Fixing method | Some rooms may need more than loose laying. | Check product and site requirements. |
| Exposure | Water, sunlight, oil and chemicals affect suitability. | Confirm resistance for the exact environment. |
Black Hidden Interlocking Tiles
Black is a popular option for workshops, commercial support areas and multipurpose rooms because it creates a consistent neutral appearance and can coordinate with a wide range of interiors.
Customers interested in this format can review the Black Hidden Interlocking Tiles product page for current specifications, availability and ordering information.
Check the material, tile dimensions, thickness, surface finish and installation requirements shown on the product page before purchasing.
Frequently Asked Questions
What are hidden interlocking rubber tiles?
They are modular rubber floor tiles with connecting sections designed to sit beneath or within the edge profile instead of forming large visible puzzle tabs.
Are hidden interlocking tiles completely seamless?
No. They can create a cleaner, seamless-looking finish, but the floor still consists of individual tiles and faint joins may remain visible.
Do hidden-lock rubber tiles need glue?
Some installations may be loose-laid, while others may require tape, perimeter securing or adhesive. Follow the instructions for the exact product and site.
Can one damaged tile be replaced?
A localised section may often be replaced by lifting tiles from an accessible edge, although the method depends on the layout and fixing system.
Can hidden rubber tiles be installed over concrete?
They may be installed over suitable concrete that is firm, clean, dry and reasonably level.
Are hidden interlocking tiles waterproof?
Do not assume that the complete modular floor is waterproof. Water may enter through edges, damaged joins or floor penetrations.
Are hidden rubber tiles suitable for workshops?
They may suit selected workshop areas, but confirm conditions involving heavy machinery, sharp waste, heat, oil or chemicals.
Are hidden rubber tiles the same as PVC hidden tiles?
No. Rubber and PVC are different flooring materials. Confirm the material shown in the exact product specification before ordering.
Final Advice on Hidden Interlocking Rubber Tiles
Hidden interlocking rubber tiles are useful where a modular floor is required but the customer wants to reduce the visual effect of exposed puzzle-style joins.
Their concealed locking design can create a cleaner and more continuous-looking surface in workshops, commercial interiors, storage rooms, multipurpose spaces and selected home training areas.
The quality of the finished floor depends on correct measuring, a balanced dry layout, careful alignment and appropriate perimeter finishing. The supporting floor should be clean, firm, dry and reasonably level before installation.
Remember that the hidden connection is only one product feature. Material, thickness, surface texture, traffic, moisture, chemicals and fixing requirements must also be considered.
When correctly matched to the application, hidden join rubber tiles can combine a neat appearance with practical modular installation and localised replacement.
Need Hidden Interlocking Rubber Tiles?
PVC Floor Tile supplies interlocking rubber flooring for workshops, commercial interiors, storage areas, multipurpose rooms and selected industrial spaces across South Africa. Send our team your dimensions, floor photographs, traffic information and preferred finish for assistance selecting a suitable tile.
Contact Us