
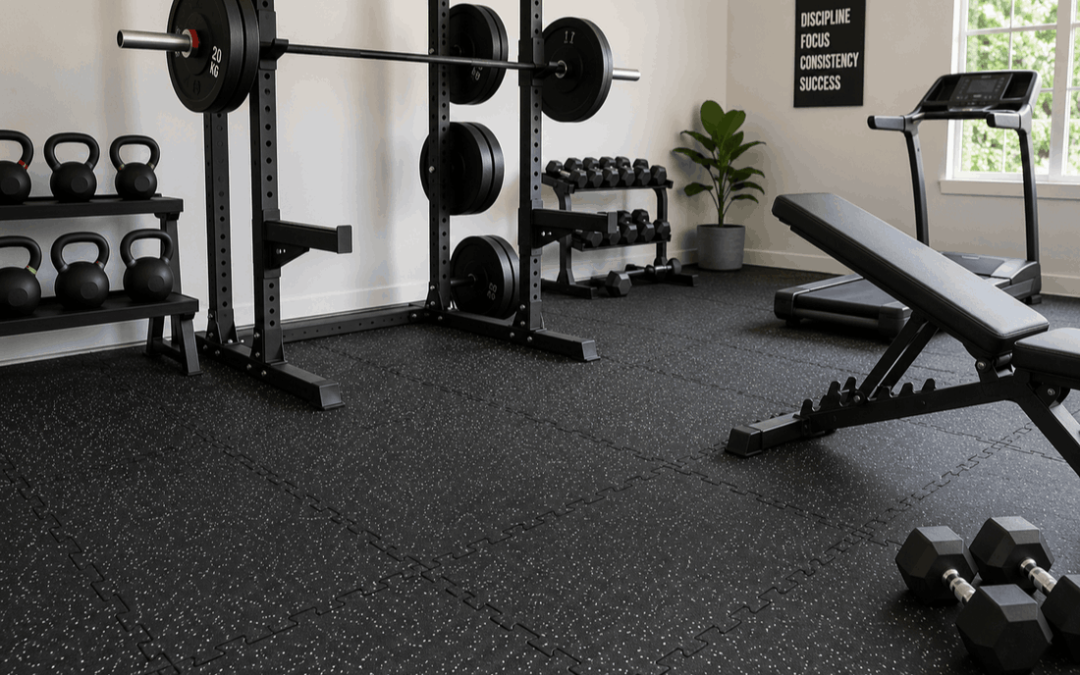
Interlocking rubber tiles for home gym spaces should be selected according to how the room will be used. A space built around a treadmill and exercise bike has different flooring needs from an area used for squats, deadlifts, dumbbells or repeated weight training. The correct tile should suit the equipment, expected impact, supporting floor and available doorway clearance. Explore our gym flooring for home training spaces when comparing practical options for cardio, strength and mixed-use rooms.
Interlocking tiles are popular because they can be connected in manageable sections, fitted around room edges and replaced locally if one area becomes damaged. They also allow homeowners to cover the complete room or build a defined exercise zone without installing one large continuous floor covering.
However, no single rubber tile thickness or surface design is suitable for every home gym. A light exercise room, moderate weight-training space and heavy lifting area should not automatically use the same product.
This guide explains how to choose interlocking rubber tiles for home gym use, plan the room layout, protect the supporting floor and decide between visible puzzle joins, hidden interlocking systems and thicker specialist gym tiles.
How to Choose Interlocking Rubber Tiles for Home Gym Use
The best tiles are those matched to the training style, equipment weight, expected impact, room size and supporting floor. Thinner tiles may suit cardio equipment and lighter workouts, while heavier strength training may require thicker specialist rubber flooring or extra protection in weight-drop zones.
Start With the Type of Home Gym You Are Building
Before choosing a tile, list the exercises and equipment that will be used regularly. The term home gym can describe anything from a yoga and stretching room to a fully equipped strength-training space.
A simple exercise room may contain resistance bands, a light bench, adjustable dumbbells and a stationary bike. A more demanding setup may include a squat rack, barbell, weight plates and heavy fixed equipment.
Cardio-focused room
Common equipment may include a treadmill, exercise bike, rowing machine or elliptical trainer.
General fitness room
The space may support bodyweight training, stretching, light dumbbells and adjustable benches.
Strength-training room
Heavier racks, barbells, plates and equipment feet create greater point loads and impact concerns.
Why Interlocking Rubber Tiles Work Well in Home Gyms
Interlocking tiles are modular. Each tile connects to neighbouring sections, helping create a larger floor without handling one heavy roll or permanently bonding the complete area.
The system may be useful for homeowners who want to complete the installation themselves, protect a defined training zone or retain access to the original floor.
Properly selected interlocking rubber tiles for home gym rooms can provide manageable installation, localised replacement and practical protection beneath compatible exercise equipment.
Main advantages
- Manageable individual tile sections
- Suitable for full rooms or smaller zones
- Can be fitted around walls and columns
- Localised tiles may be replaceable
- Many installations require limited permanent fixing
- Different joining styles are available
Important limitations
- Thin tiles are not suitable for every impact level
- Joins may move under turning equipment
- Water may enter through edges or damaged connections
- Heavy machines may create concentrated pressure
- Door clearance can be reduced
- Some rooms may require additional securing
Choose the Tile Thickness According to the Training
Thickness is one of the most important selection factors, but it should not be viewed in isolation. Rubber composition, tile density, supporting floor, equipment feet and impact level also influence performance.
A relatively thin tile may work for walking, cardio equipment and lighter home training. It should not automatically be recommended beneath repeatedly dropped barbells or heavy free-weight stations.
| Training type | Typical floor activity | Flooring consideration |
|---|---|---|
| Stretching and bodyweight exercise | Low-impact movement, yoga, mobility and floor exercises. | Comfort, surface firmness, cleaning and room coverage. |
| Cardio equipment | Treadmills, bikes and rowing machines with fixed equipment feet. | Equipment stability, vibration and concentrated loading. |
| Light dumbbell training | Weights handled carefully and placed down under control. | Moderate protection and localised equipment zones. |
| Strength training | Racks, benches, barbells and heavier plates. | Greater thickness or additional impact protection may be required. |
| Repeated weight dropping | High impact in a concentrated lifting zone. | Use specialist gym flooring designed for the expected impact. |
Important: Avoid selecting tiles only by thickness. Confirm the product material, density, intended use and installation requirements before purchasing.
Light Home Gyms and Cardio Rooms
A lighter home gym may contain a treadmill, exercise bike, resistance equipment or a small adjustable bench. In this type of room, the flooring mainly needs to protect the supporting surface from equipment feet, routine movement and minor scuffs.
The flooring should remain stable beneath the equipment. Check whether the machine has narrow feet, wheels or levelling points that concentrate its weight into a small area.
Protective pads may be needed beneath especially narrow equipment feet. This helps distribute the load and reduces the chance of visible indentations.
Rubber Tiles for Weight Training
Rubber tiles for weight training should be selected according to the heaviest equipment and the way weights will be handled. A home gym where dumbbells are placed down carefully is different from a lifting area where loaded barbells may be released onto the floor.
The floor beneath a squat rack or power cage also receives pressure from the rack feet, user movement and stored plates. A complete lifting zone may need thicker rubber or extra protection beneath the rack and weight-placement areas.
When choosing interlocking rubber tiles for home gym weight-training zones, consider both the equipment load and any repeated impact from free weights.
Consider the following before choosing weight-room tiles:
- Maximum dumbbell weight
- Barbell and plate loading
- Whether weights will be dropped
- Rack dimensions
- Bench position
- Weight-storage location
- Supporting floor material
- Available tile thickness
- Equipment-foot size
- Room transitions
- Noise and vibration concerns
- Future equipment additions
Protecting the Floor Beneath Heavy Equipment
Heavy equipment can place concentrated pressure on small feet or support points. Even where the tile material is durable, the supporting floor and tile surface may need extra load distribution.
Place suitable protective pads or load-spreading plates beneath equipment where required. These should be stable and should not create raised edges in walking routes.
Do not assume that a soft floor is always better. Flooring that is too soft may allow equipment to move, rock or settle unevenly.
Concrete Floors
Concrete is a common base for garages, outbuildings and ground-floor home gyms. The surface should be firm, clean, dry and reasonably level before installing interlocking tiles.
Remove grit, loose paint, oil and raised repair material. Large cracks, holes or moisture problems should be assessed before covering the floor.
Rubber tiles may help provide a practical training surface, but they should not be used to conceal major concrete damage or unresolved water entry.
Installing Rubber Tiles Over Ceramic Tiles
Interlocking rubber tiles may be installed over stable ceramic or porcelain tiles where the base is flat and secure. Loose tiles, broken sections and major grout-line differences should be addressed first.
The combined floor height may affect doors, skirting, cupboards and transitions into neighbouring rooms. Measure these clearances before ordering the flooring.
Avoid trapping moisture between the rubber floor and tiled surface. Keep the gym dry and inspect the perimeter periodically.
Wooden and Laminate Floors
A wooden, engineered or laminate floor may require additional care because heavy equipment and trapped grit can mark the original surface.
Confirm that the supporting structure can handle the equipment load. Flooring tiles do not increase the structural strength of the room.
Where necessary, use a suitable protective layer approved for the existing floor. Avoid materials that may stain, react with or trap moisture against the original surface.
Full-Room Coverage Versus a Training Zone
Some home gyms benefit from complete wall-to-wall flooring, while others only need protection beneath the equipment and active training area.
Full-room coverage
- Creates one consistent surface
- Reduces exposed tile edges
- Can simplify equipment placement
- Provides wider protection
- Requires more measuring and cutting
Defined gym zone
- Uses less flooring material
- Suitable for one rack or equipment station
- Can leave the original floor visible elsewhere
- Requires secure exposed edges
- May need transition pieces
Visible Puzzle Tiles or Hidden Interlocking Tiles?
Traditional puzzle tiles display their interlocking tabs around every edge. They create a clearly modular appearance and can be straightforward to align during installation.
Hidden-lock tiles conceal most of the joining system beneath the visible surface. They can create a cleaner, more continuous-looking finish in home gyms where appearance is important.
Read more about the benefits and limitations of hidden interlocking rubber tiles before choosing between concealed and visible joining systems.
| Feature | Visible puzzle joins | Hidden joins |
|---|---|---|
| Appearance | Strong modular or puzzle-style finish. | Cleaner and more continuous-looking surface. |
| Alignment | Tabs are easy to see during installation. | Concealed locks require careful positioning. |
| Gym style | Practical workshop or training-room appearance. | Suitable where a neater visual finish is preferred. |
| Replacement | Connections are easy to identify. | Neighbouring tiles may need to be lifted from an edge. |
Measure the Home Gym Carefully
Measure the room length and width in more than one place. Walls may not be perfectly straight, especially in converted garages, storerooms and outbuildings.
Record the position of doors, cupboards, columns, steps, floor drains and fixed equipment. Calculate the number of full tiles required and add an allowance for cutting and future replacements.
Quantity reminder: Keep several spare tiles from the same order where possible. They may be useful for future repairs or room changes.
Plan Equipment Before Installing the Floor
Draw a simple room plan showing the proposed positions of the treadmill, rack, bench, dumbbell storage and open exercise area.
This helps identify the most important impact zones and prevents seams or exposed edges from being positioned beneath moving equipment where practical.
Leave enough space for safe movement around the equipment. Flooring cannot correct a room layout that is too crowded.
How to Install Interlocking Rubber Tiles for Home Gym Floors
Clear and inspect the room
Remove equipment and check the supporting floor for moisture, loose material and uneven areas.
Clean the supporting floor
Sweep and vacuum grit so particles are not trapped beneath the tiles.
Complete a dry layout
Position several rows before cutting to check alignment and perimeter widths.
Connect the full tiles
Align the interlocking edges and press each complete join securely into place.
Measure perimeter sections
Mark wall and doorway cuts individually because room dimensions can vary.
Finish exposed edges
Use suitable transition pieces or edging where the floor ends in an open area.
Do Home Gym Rubber Tiles Need Adhesive?
Many interlocking floors can remain loose-laid in enclosed rooms because the connected tiles function as one larger surface. However, no-glue installation is not suitable for every room.
Additional securing may be needed around open edges, doorway transitions or areas exposed to repeated turning equipment.
Follow the product-specific installation instructions and avoid applying an adhesive that has not been confirmed as compatible with both the rubber and supporting floor.
Door Clearance and Floor Transitions
Rubber flooring raises the finished floor level. Check whether doors can open over the planned tile thickness before completing the installation.
Where the gym floor joins a passage, tiled room or garage section, a suitable transition can reduce the exposed edge and make movement between surfaces easier.
Doorway edges receive frequent foot traffic and equipment movement, so they should be inspected regularly.
Placing Gym Equipment on the Tiles
Do not drag heavy equipment across newly installed tiles. Lift and position the equipment using enough people or suitable handling equipment.
Check that racks, benches and machines remain level. Adjust equipment feet according to the manufacturer’s instructions.
After several training sessions, inspect the tiles beneath heavy equipment for compression, movement or separated joins.
Can Weights Be Dropped on Interlocking Rubber Tiles?
Do not assume that all home gym rubber floor tiles are designed for repeated weight dropping. Thin general-purpose tiles may protect against light movement but offer limited impact control under heavy barbells.
A dedicated lifting area may require thicker gym tiles, impact pads or a specialist lifting platform. The correct solution depends on the weight, drop height and supporting floor.
Safe product wording: Describe a tile according to its confirmed specification. Do not promise that a general home-gym tile will protect every subfloor from every dropped weight.
Cleaning Interlocking Rubber Tiles for Home Gym Areas
Sweep or vacuum loose grit before damp cleaning. Dirt trapped beneath equipment or between damaged joins can mark the supporting floor and make the gym harder to maintain.
Use a mild cleaner confirmed as suitable for rubber flooring. Avoid excessive water, strong solvents and oily products that may leave residue.
Simple home-gym cleaning routine:
- Remove loose litter
- Vacuum around equipment
- Clean sweat and spills promptly
- Use a compatible mild cleaner
- Damp-mop controlled sections
- Remove detergent residue
- Allow the floor to dry
- Inspect interlocking joins
- Check equipment feet
- Clean exposed transitions
Common Home Gym Flooring Mistakes
| Mistake | Possible problem | Better approach |
|---|---|---|
| Choosing by price only | The tile may not suit the equipment or impact level. | Compare material, thickness and intended use. |
| Ignoring equipment feet | Small feet may create concentrated pressure. | Use suitable load-distribution protection. |
| Failing to measure doors | The door may scrape or stop opening. | Check finished floor height before ordering. |
| Using thin tiles for heavy drops | The impact may damage the flooring or supporting floor. | Use specialist impact flooring where required. |
| Leaving open edges unfinished | Tiles may move or create an awkward transition. | Install suitable edging or transitions. |
| Installing over grit | Particles may create raised points beneath the floor. | Sweep and vacuum thoroughly first. |
When Thicker Specialist Gym Flooring Is Better
Thicker flooring may be more appropriate where a home gym contains heavy free weights, commercial-style racks or repeated impact zones.
The objective should not be to install the thickest product available everywhere. Instead, match the flooring to the actual activities and consider whether different zones need different levels of protection.
For example, the cardio and stretching section may use one suitable modular surface, while the main lifting zone uses thicker tiles or a dedicated platform.
Choosing Interlocking Rubber Tiles for Home Gym Projects
Review the exact material, tile dimensions, thickness, surface pattern and intended application before purchasing. Similar-looking tiles may be designed for different uses.
Browse the available interlocking rubber tiles and compare each product specification against your training equipment and floor conditions.
Avoid selecting a product from photographs alone. Product density, joining style and material composition are important even when two tiles appear visually similar.
General Exercise-Space Safety
The floor forms one part of a safe training space. Equipment should be assembled, positioned and used according to the manufacturer’s instructions.
Maintain clear movement routes, adequate lighting and enough space around racks, benches and cardio equipment. Remove loose objects that could become trip hazards.
For general workplace information about preventing slips and trips, visit the Health and Safety Executive slips and trips guidance website.
Frequently Asked Questions
Are interlocking rubber tiles suitable for a home gym?
Yes, provided the selected tile suits the equipment, training style, impact level and supporting floor.
What thickness should home gym rubber tiles be?
The appropriate thickness depends on the equipment, expected impact, material specification and way the gym will be used.
Can thin rubber tiles be used beneath a treadmill?
They may suit selected cardio setups, but check the treadmill weight, equipment feet, vibration and product specification.
Can weights be dropped on rubber puzzle tiles?
Only where the exact flooring is designed for the expected weight and impact. General-purpose thin tiles may not be suitable.
Do interlocking gym tiles need glue?
Many enclosed installations may remain loose-laid, while open edges or higher-movement areas may require additional securing.
Can rubber tiles be installed over ceramic flooring?
They may be placed over stable, level tiles after checking door clearance, grout differences and moisture conditions.
Are hidden interlocking tiles good for home gyms?
They can provide a cleaner-looking finish, but the thickness, rubber material and intended use must still match the training space.
How do I calculate how many tiles I need?
Measure the room area, divide it by the coverage of each tile and include an allowance for cutting and spare sections.
Final Advice on Interlocking Rubber Tiles for Home Gym Floors
The best interlocking rubber tiles for home gym spaces are not determined by one thickness, surface pattern or price. The correct product should match the equipment, training style, impact level and supporting floor.
Begin by deciding whether the room will support cardio, general fitness, strength training or repeated weight dropping. Measure the complete floor, door clearance, equipment footprint and available transition space.
Use thinner general-purpose tiles only where their specification matches the planned activity. Heavier lifting zones may require thicker specialist gym flooring or additional impact protection.
Complete a dry layout before cutting and inspect the floor regularly after the equipment has been positioned. Properly chosen interlocking rubber tiles for home gym areas can create a practical, maintainable and professional-looking training space.
Need Help Choosing Home Gym Flooring?
PVC Floor Tile supplies gym flooring and interlocking rubber tiles for home gym and home training spaces across South Africa. Send our team your room dimensions, equipment list, photographs and preferred training activities for assistance selecting a suitable flooring option.
Contact Us