Choosing the right floor tiles is only one part of creating a strong and long-lasting floor. Whether you are working with ceramic tiles, rubber tiles, modular tiles or PVC flooring solutions, the way the floor is installed and maintained plays a major role in how well it performs over time.
Poor installation can lead to uneven surfaces, loose sections, weak joins and early damage, while poor maintenance can make even a good floor look worn before its time. This floor tile installation and maintenance guide explains the basic steps, checks and care habits that help different flooring types last longer.
The guide is written for homeowners, business owners, workshop managers, gym owners and property managers who want a practical understanding of how to install, clean and look after floor tiles correctly. The goal is to help you understand what matters before, during and after installation, so your floor remains safer, cleaner and easier to maintain.
Why Floor Tile Installation and Maintenance Matters
A floor is used every day. People walk on it, clean it, move furniture over it, park vehicles on it, exercise on it or work on it depending on the space. If the flooring is not installed properly, problems can start early.
Poor installation may cause gaps, lifting edges, uneven surfaces or movement between tiles. Poor maintenance may lead to dirt build-up, stains, slippery areas, surface damage or hygiene issues.
Good floor tile installation and maintenance helps improve:
- Long-term durability
- Floor safety and stability
- Cleaning results
- Surface appearance
- Comfort underfoot
- Protection for the base floor
- Overall value of the flooring
Whether the floor is used in a home, gym, garage, workshop, school or commercial area, proper care makes a difference.
Preparing the Floor Before Installation
Before installing any type of floor tile, the surface underneath must be checked. This is one of the most important steps because the base floor affects the final result.
A floor should be clean, level, dry and stable before tiles are installed. Dust, loose material, moisture or uneven areas can affect how the tiles sit on the floor. For some flooring types, such as ceramic, porcelain and epoxy systems, proper preparation is even more important because the tiles or coating depend heavily on the condition of the base surface.
Important preparation checks
Before installation, check whether the floor is free from loose dust, oil, grease, moisture, cracks, sharp bumps and unstable sections. If the base floor is damaged or uneven, it may need repair or preparation before installation begins.
For modular flooring systems, small surface imperfections may be easier to manage, but the floor should still be reasonably clean and stable. A better base surface usually gives a better final result.
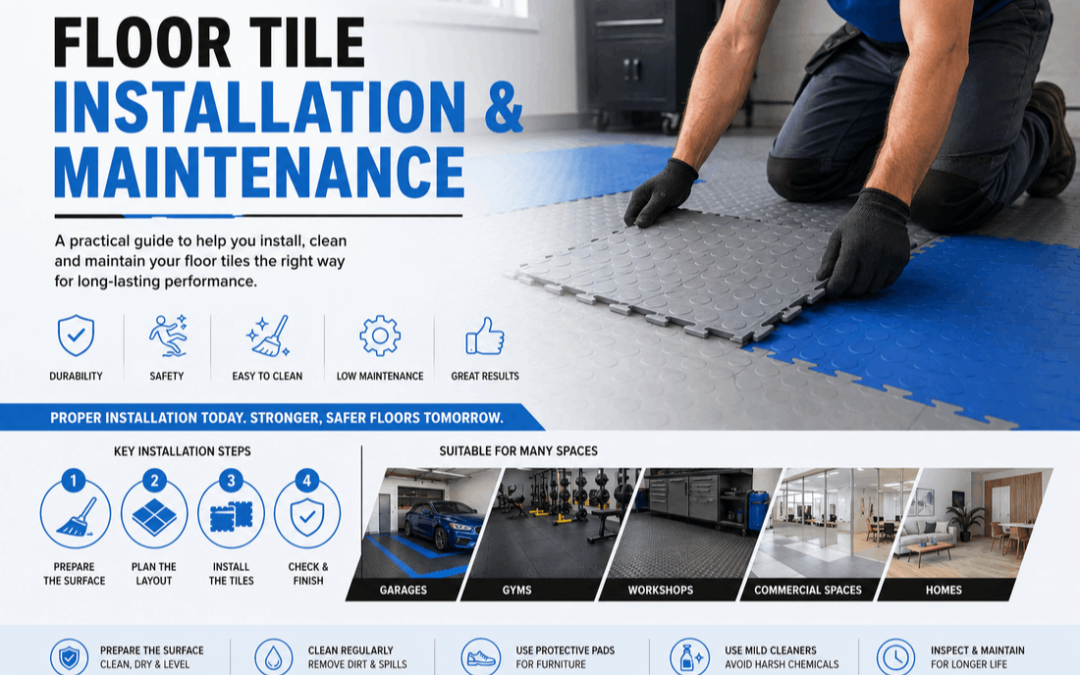
Installing Modular Floor Tiles
Modular tiles are commonly used in garages, workshops, gyms, commercial spaces and other practical environments because they are easier to install than many permanent flooring systems. Many modular tiles are designed to connect together using interlocking edges, which means they can often be installed without adhesive.
Modular flooring is popular in practical spaces because it can create a durable and easy-to-maintain surface over an existing floor. It is often used where the floor needs to handle regular movement, cleaning and daily wear.
When installing modular floor tiles, it is important to measure the space carefully, plan the layout and allow for neat edges where tiles meet walls, doors or fixed objects.
Clean the Surface
Start with a clean and dry floor. Remove dust, grit, oil and loose material before installing tiles.
Plan the Layout
Lay the tiles in a planned direction so the pattern and joints remain consistent across the floor.
Check Alignment
Work from a straight edge where possible and check the layout as you go to keep the floor neat.
Test a Small Area
In larger areas, test a small section first before completing the full installation.
Installing Rubber Floor Tiles
Before installing rubber floor tiles, the floor must be clean and dry. Rubber tiles should also be placed carefully so they sit flat and do not create raised edges.
Where rubber floor tiles work well
Rubber floor tiles are useful in spaces where cushioning, grip and floor protection are important. This includes gym areas, training zones, home exercise rooms, light work areas and some commercial spaces.
However, rubber flooring should be chosen according to the use of the area. A heavy weightlifting zone, a light home workout space and a commercial gym may not all need the same thickness or tile type.
Installing Ceramic and Porcelain Floor Tiles
Ceramic and porcelain tiles are commonly used in homes, kitchens, bathrooms, offices and some commercial interiors. They can create a clean and attractive finish, but they require careful installation.
These tiles are usually installed with adhesive and grout. The base floor must be properly prepared because uneven surfaces can cause cracks, poor bonding or uneven tile levels.
Key installation points
Ceramic and porcelain tiles must be laid with accurate spacing and correct adhesive. Grout lines should be consistent and properly sealed where needed. The floor should be allowed to set correctly before heavy use.
Unlike modular tiles, ceramic and porcelain tiles are not usually easy to remove or replace section by section without tools and repair work. This makes proper installation especially important from the beginning.
Installing Epoxy-Coated Floors
Epoxy is not a tile in the same way as modular, rubber, ceramic or porcelain tiles, but it is often compared with tiled flooring because it creates a finished floor surface. Epoxy coatings are used in garages, workshops, warehouses and commercial spaces where a smooth coated finish is preferred.
Epoxy installation depends heavily on surface preparation. The floor usually needs to be cleaned, repaired and prepared before the coating is applied. If the base floor has moisture, dust, weak concrete or oil contamination, the coating may not perform properly.
Important epoxy considerations
Epoxy can create a neat and smooth surface, but it should be applied correctly. The floor may also need an anti-slip texture depending on the environment. In areas where water, dust or oil may be present, surface grip should be carefully considered.
Cleaning Floor Tiles After Installation
Once floor tiles are installed, proper cleaning helps keep the floor in good condition. The first cleaning should be gentle and suitable for the flooring type. Harsh chemicals, excessive water or incorrect cleaning tools can damage some surfaces.
For most practical floors, regular sweeping or vacuuming helps remove dust and loose dirt. Mopping with mild cleaning products can help keep the surface fresh. Spills should be cleaned quickly, especially in areas where safety and hygiene matter.
Workplace guidance on preventing slips, trips and falls also highlights the importance of keeping walking surfaces clean, clear and properly maintained. This is especially important in commercial spaces, workshops, gyms and high-traffic areas.
Maintenance Tips for Different Floor Tile Types
Modular Floor Tiles
Keep the floor free from grit and dirt. Clean spills quickly, use mild cleaning methods and avoid harsh solvents unless they are confirmed safe for the tile surface.
Rubber Floor Tiles
Sweep or vacuum loose dirt first. Mop with mild soap and water, avoid strong chemicals and allow the floor to dry properly after cleaning.
Ceramic and Porcelain Tiles
Sweep or vacuum loose dirt, mop with a suitable cleaner and pay attention to grout lines where dirt can collect over time.
Epoxy Floors
Sweep frequently, clean spills quickly, avoid dragging sharp objects and monitor high-traffic areas for surface wear.
Common Installation Mistakes to Avoid
Many flooring problems start because important steps are skipped during installation. Taking time to prepare and plan properly can prevent future problems.
Mistakes to avoid
- Installing tiles over dirty, oily or wet surfaces
- Ignoring uneven base floors
- Rushing adhesive or coating curing times
- Using the wrong tile for the wrong environment
- Leaving raised edges or loose sections
- Forgetting expansion or movement needs where applicable
Choosing the correct product and installing it correctly is always better than trying to fix problems later.
Common Maintenance Mistakes to Avoid
Maintenance mistakes can shorten the life of a floor. Even strong flooring can be damaged by poor cleaning habits or misuse.
Mistakes to avoid
- Using harsh chemicals without checking compatibility
- Soaking floors that are not designed for water exposure
- Dragging sharp metal objects over the surface
- Ignoring small damaged sections
- Allowing oil, dust or grit to build up for long periods
Good maintenance is not complicated, but it must be consistent.
How Often Should Floor Tiles Be Cleaned?
Cleaning frequency depends on the type of space. A quiet home area may need less cleaning than a gym, workshop, garage or retail space.
High-traffic areas should be swept or checked more often. Spills should always be cleaned quickly. Floors used for exercise, work or commercial activity may need daily cleaning or weekly deeper cleaning depending on use.
When to Replace or Repair Floor Tiles
Even well-maintained flooring may eventually need repair or replacement. The advantage of many modular tile systems is that damaged sections can often be replaced without removing the entire floor.
Tiles may need attention if they become cracked, loose, curled, badly stained, slippery, uneven or damaged by chemicals or heavy use.
Signs that your floor needs attention
Look for lifting edges, broken sections, worn surfaces, loose tiles, damaged grout, strong odours, trapped moisture or areas that no longer clean properly. Fixing small issues early can help prevent bigger problems.
Final Thoughts
Floor tile installation and maintenance are important for keeping floors clean, safe and longer lasting. Whether the floor is made from modular tiles, rubber tiles, ceramic tiles, porcelain tiles or epoxy coating, the same basic principles apply: prepare the base properly, install the flooring correctly and clean it regularly.
The best flooring results come from matching the product to the environment. A garage, gym, workshop, home and commercial space may each need a different flooring solution. Once the correct flooring is installed, good maintenance helps protect the investment and keeps the space looking professional.
Need Help Choosing or Maintaining Floor Tiles?
Need help choosing the right floor tiles for your space or understanding how to maintain them properly? Contact PVC Floor Tile for practical advice, product guidance and support with flooring solutions for homes, gyms, garages, workshops and commercial areas.
