Rubber Tiles Background
In this post I shall try and explain how to set rubber tiles. Interlocking rubber tile flooring is one of the most adaptable flooring solutions now available on the market. Industrial and commercial sports centres make use of the tiles because of their shock-absorbing properties.
Rubber tiles can even be installed around the perimeter of sports stadiums where the draining ability of the tiles is critical.
Steps to Installing Rubber Tiles;
Intertwining rubber tiles are one of the most versatile flooring solutions on the market. Sporting facilities like gyms utilize them for their shock-absorbing properties. Playground floors are often covered in interlocking tiles, taking advantage of the tile’s outdoor durability. The rubber tiles can even be found around the perimeter of major sporting facilities arena where the draining ability of the tiles is essential.
Ordinarily anyone can assemble the tiles, provided you can manage the weight of a single rubber tile. To get to know more this interesting flooring type I encourage you to keep reading this post.
What Types of Tools and Materials Is Required:
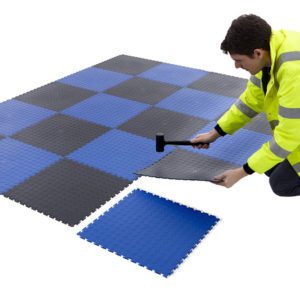
- Sledgehammer
- Chalk
- Plastic connector pins
- Interlocking tiles
- Sledgehammer
- Knife
- A carpenter ruler
Preparation:
- The old floor should be structurally sound and relatively level. Rubber tiles can be installed on concrete, wood, asphalt and compacted dirt surfaces
- Make use of a vacuum cleaner or hard hairs broom to clear the subfloor of any debris or unwanted matter like dust.
- Make sure the surface is free from any oil, grease and other foreign substances that may complicate installation. A mop can be used to remove any such so that the area made ready for installation. The floors should then be left to dry completely.
- The rubber tiles must be removed from their packaging 24hrs before installation to allow them to stabilize to the ambient temperature of the room.
- To pre-empt the possibility of a strong rubber odour, the tiles must be wiped with a damp cloth.
Installation Process
- Insert the plastic connector pins into the pre-drilled slots on two end-to-end sides of each tile. It is highly recommended to stack tiles in piles of four to eight pieces and then begin to insert the connector pins into the slots of adjacent sides while the tiles are in a pile. This makes it convenient to insert the pins and time saving.
- Collect and place the tiles in the corner of the area you intend to cover. You should ensure that the plastic connector pins are inserted in the tile point along the perimeter of the area.
- Grab and place another tile and align the connector pins of the first tile with the pre-drilled slots of the second tile. It is highly recommended that tiles are placed as close to the wall as possible. The wall acts as a guide, and the plastic pins and slots will assist in aligning the tiles.
- Slide in the second tile towards the first tile so that the pins enter slot. Push the tiles together with your hand as far as you can. When you begin to feel resistance, use a sledgehammer to carefully tap the second tile towards the first to seal the gap. To avoid damaging the tile with the rubber mallet, hit the tile at an angle towards the other tile. Try not to hit the same exact spot on the tile, as this may damage the tile.
- Continue to work down the first row until you reach the corner on the opposite wall or border, and then move on to subsequent rows until the entire area is covered.
- Great you have just managed to install rubber tiles they DIY way! Your rubber flooring is ready to rock! Clean your hands, and treat yourself to a nice, cold fruit juice.
Rubber tiles are great for flooring option for both the cost-conscious consumer. The interlocking mechanism of the tile eradicates the use of untidy pastes and keeps professional at some distance from your home.
To find out more, click here to get in touch with one of our sales consultants.


